Yes ! When you want to save a moment, or a certain situation when playing games to share with friends, you often use the keystrokes Windows + Print Screen on the keyboard to take a screenshot of the computer right nào
Especially when you get High-Light in the game, for example, you just did a Pentakill in League of Legends, or won TOP # 1 in PlayerUnknown's Battle Ground (PUBG), for example, and you want to show it to you immediately. your friends !
We can still use the capture key combination available on Windows. However, there are some games and some computer models when taking screenshots in the game in full screen mode will produce a black image. Photography is faulty in general.
This is quite a pity, as you may have missed the great shots of that game. So how to take screenshots in the game safely? Here I want to talk about games on Steam.
Okay, if you do not know then let's go solve this problem through the article below!

How to take screenshots when playing games on the Steam Client
As I said above and I'm also experiencing that situation when using keystrokes Windows + Print Screen to take a screenshot, the image after it has been blackened out but nothing 🙁
I think Steam understands this, and they have provided us with a screenshot tool right above Steam Client.
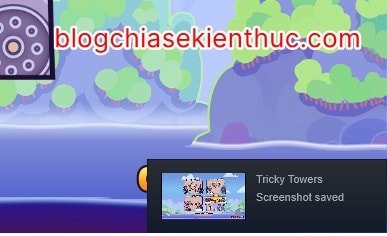
Usage is very simple, when encountering a situation in the game that you want to save it, you just need to press the key F12 on the keyboard is done.
The screen after the capture will be saved immediately, and there is a sound with the notification Screenshot Saved appears in the corner of the screen - whichever angle is up to you, but defaults to the top left corner of the game screen.
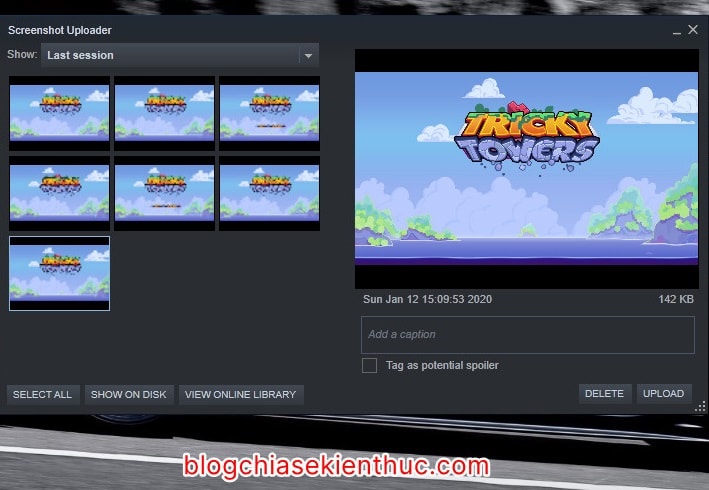
Feel free to shoot, and after you exit the game, a window will appear Steam Uploader Summary of the photos you have taken. This is the application you manage the screenshots on Steam. You can click on:
- Select All: Select all of these pictures that have been taken.
- Show On Disk: Display these photos in the File Explorer folder, which is also the folder containing game screenshots of Steam, which I will talk about later.
- Delete: Delete selected image
- Add a caption: Add a description to the photo.
- Upload: Upload the selected photo with Captioon wrote to your online photo library.
- View Online Library: View your online photo library on Steam, of course you have to click the button
Uploadthe picture will be ..
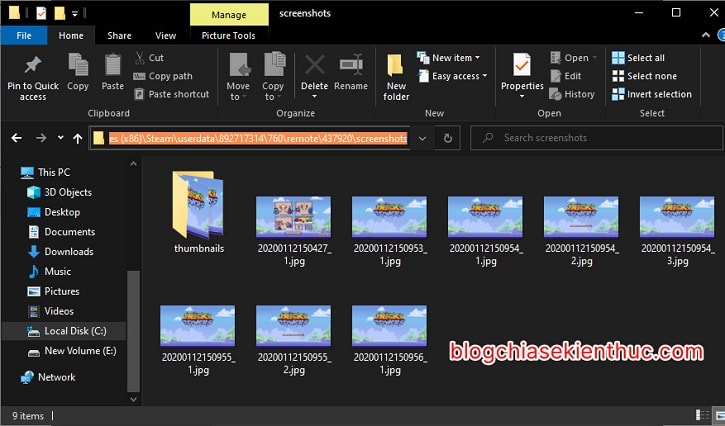
The default save game image folder of Steam will be:
C: Programfiles (x86) Steam userdata ID_Steam 760 remote ID_Game screenshots
In the above path there are two things that will change: one is ID tài khoản Steam - each person has a different ID, and two are ID của tựa game you play.
- User ID is a sequence generated by Steam randomly and if you use only one account, you do not need to care.
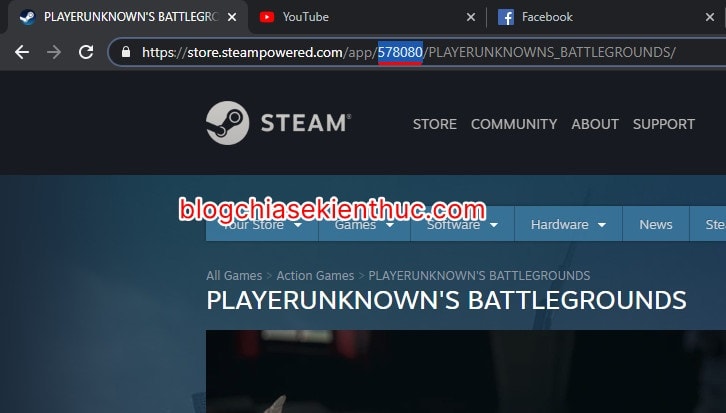
- And about ID of the game, this is extremely easy, you just need to go to the introduction page of the game you play on the Steam game market => the number of lines you underlined and highlight after
/app/In the picture below is the ID of that game.
IDs of some popular games are:
- PlayerUnknown’s Battle Ground: 578080
- Counter-Strike Global Offensive: 730
- Grand Theft Auto V: 271590
- The Witcher 3: Wild Hunt: 292030
- Monster Hunter: World: 582010
- Rainbox Six: Siege: 359550
- Rise Of the Tomb Raider: 391220
- ……………………………………………….
Once determined ID Game and ID của tài khoản then => you only need to access the correct address that you left above.
For example, I want to see a screenshot of the game Tricky Tower with ID was 437920 then I will access the following link:
C: Program Files (x86) Steam userdata UserID 760 remote 437920 screenshots
Note is not to reveal your account ID, it is an important information there. Therefore, I also did not publicize the demo link above, please understand.
We can also change the photography shortcut, and the folder to save the image after taking it according to your needs.
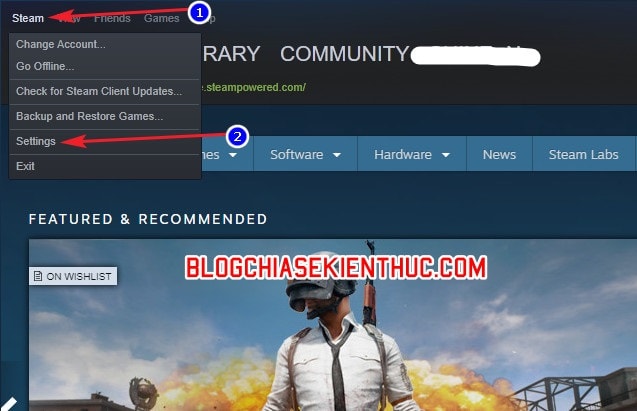
Perform: First open up Steam Client => and then click on the word Steam in the left corner of the screen => and select Settings to open the settings.
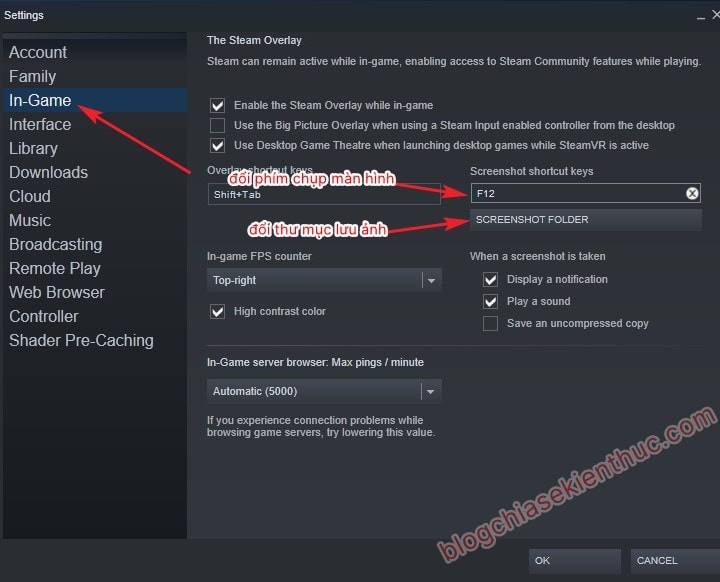
In the settings, move on to the section In-game => You can change the screenshot shortcut by clicking on the box with text F12 => then press the key or key combination you want to replace.
To replace the photo storage folder, do the following:
Perform:
You click on Screenshot Folder to change the directory where screenshots are saved.
Note: This is obviously a feature that they allow to change, but for some reason I have tried to change it and still keep it in the default folder only, who knows how to help me down below!
You can also turn off voice and notification when taking photos by removing tick marks in both lines:
- Display a Notification.
- And Play a Sound.
=> Finally click OK, got it to complete the setup.
Epilogue
Hopefully after this article you will know how to take screenshots of games on Steam and can share interesting, memorable moments to everyone!
There are many interesting and interesting tips about Steam that I want to introduce to you, but please look forward to the following article! Good luck !
CTV: Nguyen Thanh Tung - Blogchiasekienthuc.com
Note: Was this article helpful to you? Do not forget to rate the article, like and share it with your friends and relatives!

0 Comments