WordPress custom fields are an important part of turning WordPress into a flexible content management system, rather than just a blogging platform.
When it comes to WordPress custom fields, the Freemium Advanced Custom Field plugin is one of the most well-known names. It makes it easier to work with custom fields in every way and that is the subject of our post today.
Specifically, we will explain why Advanced Custom Fields are so valuable and then show you step by step how you can apply it to your WordPress site.
This is everything you will find in this article:
There is a lot to cover, so please dive
What is the Advanced Custom Field plugin?
Developed by Elliot Condon, Advanced Custom Field - often shortened to ACF - is a WordPress plugin that allows you to add and manage WordPress Custom Fields to a website. It is available both as a free and premium plugin, called ACF PRO, starting at $ 25 for lifetime updates and for a website.
Support
What is a WordPress custom field? What do they let you do?
WordPress custom fields allow you to add, store and display additional information about a piece of content in WordPress. On a more technical level, custom fields help you store metadata.
Even if you are not familiar with this term, custom fields provide a lot of functionality in your favorite plugins and themes.
For example, WooCommerce, the most popular way to build an eCommerce store, uses custom fields to store additional information about a product like:
- Price
- Weight
- Color
Or, if you have a WordPress event calendar plugin, that plugin will use custom fields to store more information about an event, such as:
- Location
- Start time / end time
- Price
You can also create your own custom fields to store information that suits your unique needs, which is what this entire post is about.
How great are custom fields in WordPress, uh? Learn how to take advantage of them with the awesome @wp_acf in our latest tutorial! 💪Press HERE TO TWEET
When should you use custom fields?
Now, you may be wondering why you even need custom fields in the first place.
For example, if you want to post an event on your WordPress site, can't you put all that information as regular text in the WordPress editor?
Yes, yes you can. But using custom fields is a better approach for several reasons:
- Input more easily - instead of importing everything from scratch, a well-organized set of custom fields makes data entry much easier. For example, instead of entering a date, you can only select dates from the date picker.
- Consistency - the information you enter in custom fields will always display according to your settings, which means that information will be consistent across your site.
- Easy to update and maintain - if you want to change something about how that information appears in the future, you can only update one thing instead of having to edit each post.
WordPress includes integrated custom field functions
WordPress actually includes built-in functionality to add custom fields to your content. In the classic TinyMCE editor, you can turn this option on from the Screen Options area. Or, in the new block editor, you can enable it from the Options area:
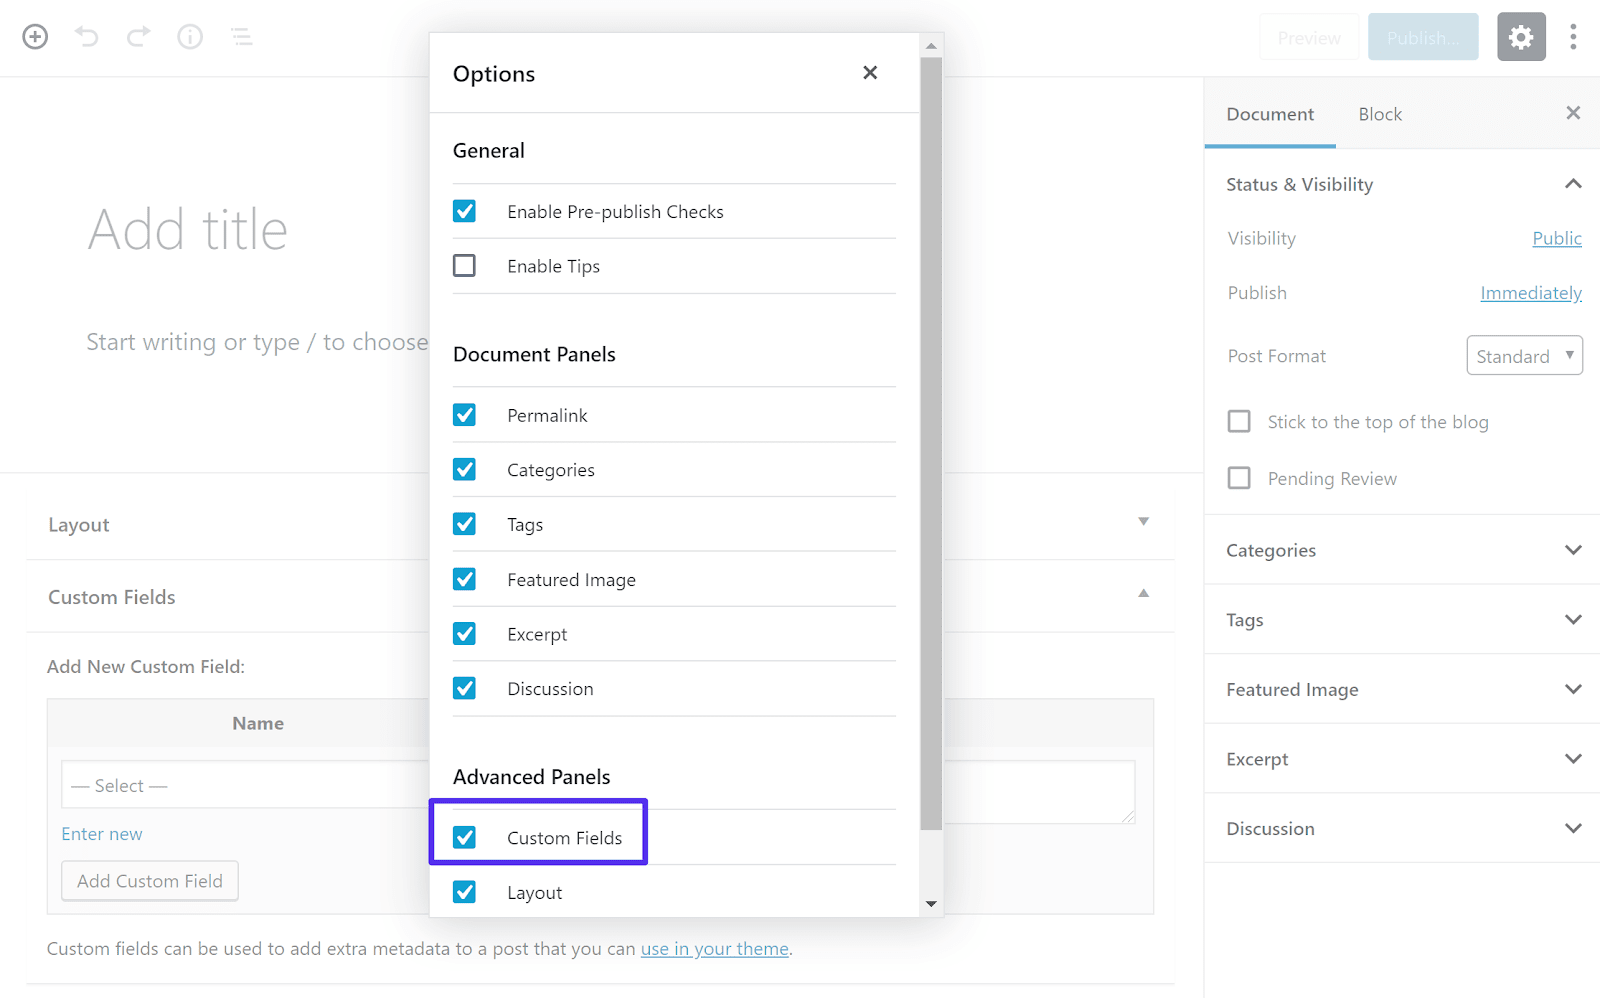
How to access custom fields in the block editor
You can then enter your custom field data with key / value pairs:
Integrated WordPress custom field function
This custom field function is completely functional, but it's not the most user-friendly way to get things done, which is why so many people switch to the Advanced Custom Field plugin instead.
Advanced custom fields make it a lot easier
Put simply, Advanced custom field makes working a lot easier with custom fields in WordPress in many ways.
It simplifies the interface to add and manage custom fields in your WordPress dashboard, and it also simplifies the process of displaying information from custom fields on your site's entrance. That fact only helps explain why it works on over 1 million websites with a 4.9 star rating on over 1,000 reviews.
In the backend, it will allow you to create user-friendly meta boxes including pre-selected field types. So instead of the general key-value pair interface (like what you saw above), you'll be able to use date pickers, checkboxes, and more:
Advanced custom fields in the block editor
In total, Advanced Custom Fields offers over 30 different types of fields that you can add to any area of your dashboard, including posts, users, categories, media, comments. and even custom option pages.
You can See detailed information on each field type here .
Advanced custom fields also make that information a lot easier, with well-written functions, shortcodes, Gutenberg blocks, etc.
Or, you can find integrations with other tools, like some drag and drop WordPress page builders.
Advanced custom fields Free vs Pro: Which do you need?
Advanced custom fields offer both free and affordable premium versions.
For most basic uses, the free version is perfectly fine. It gives you access to almost any kind of school, as well as all of the time-saving and user-friendly features outlined above.
If you just want to store some additional information about your content, the free version is all you need.
As mentioned, the Pro version has some pretty handy features that help you use Advanced Custom Fields in more interesting ways:
- Repeating fields - these fields allow you to repeat specific fields / groups of fields on a per post basis. For example, if you add speaker information to an event, the repeat field helps you handle situations with more than one speaker (you can just repeat the fields for the speaker as many times as needed, allowing you handle edge cases with multiple speakers).
- ACF block - displays your fields as a Gutenberg block, instead of a meta box. This is especially handy if you are building a website for customers and want to give them an easy way to enter and visualize custom field data.
- Flexible content fields - create layouts from other fields. It is like a lightweight page builder based on custom field information.
- School library - upload multiple photos to a school.
There are also a number of other differences, such as options pages, the ability to copy fields, improvements to relational fields, and other smaller adjustments.
You can See all ACF PRO features here .
ACF PRO starts at $ 25 for lifetime use on a website. Or, you can pay $ 100 for lifetime use on unlimited websites.
When in doubt, start with the free version until you find the exact function you need. You can always upgrade later if needed.
Advanced custom field guide: How to add your field
Now let's dive into the augmented reality Custom Field tutorial, and I'll show you how to create and display your first set of custom fields.
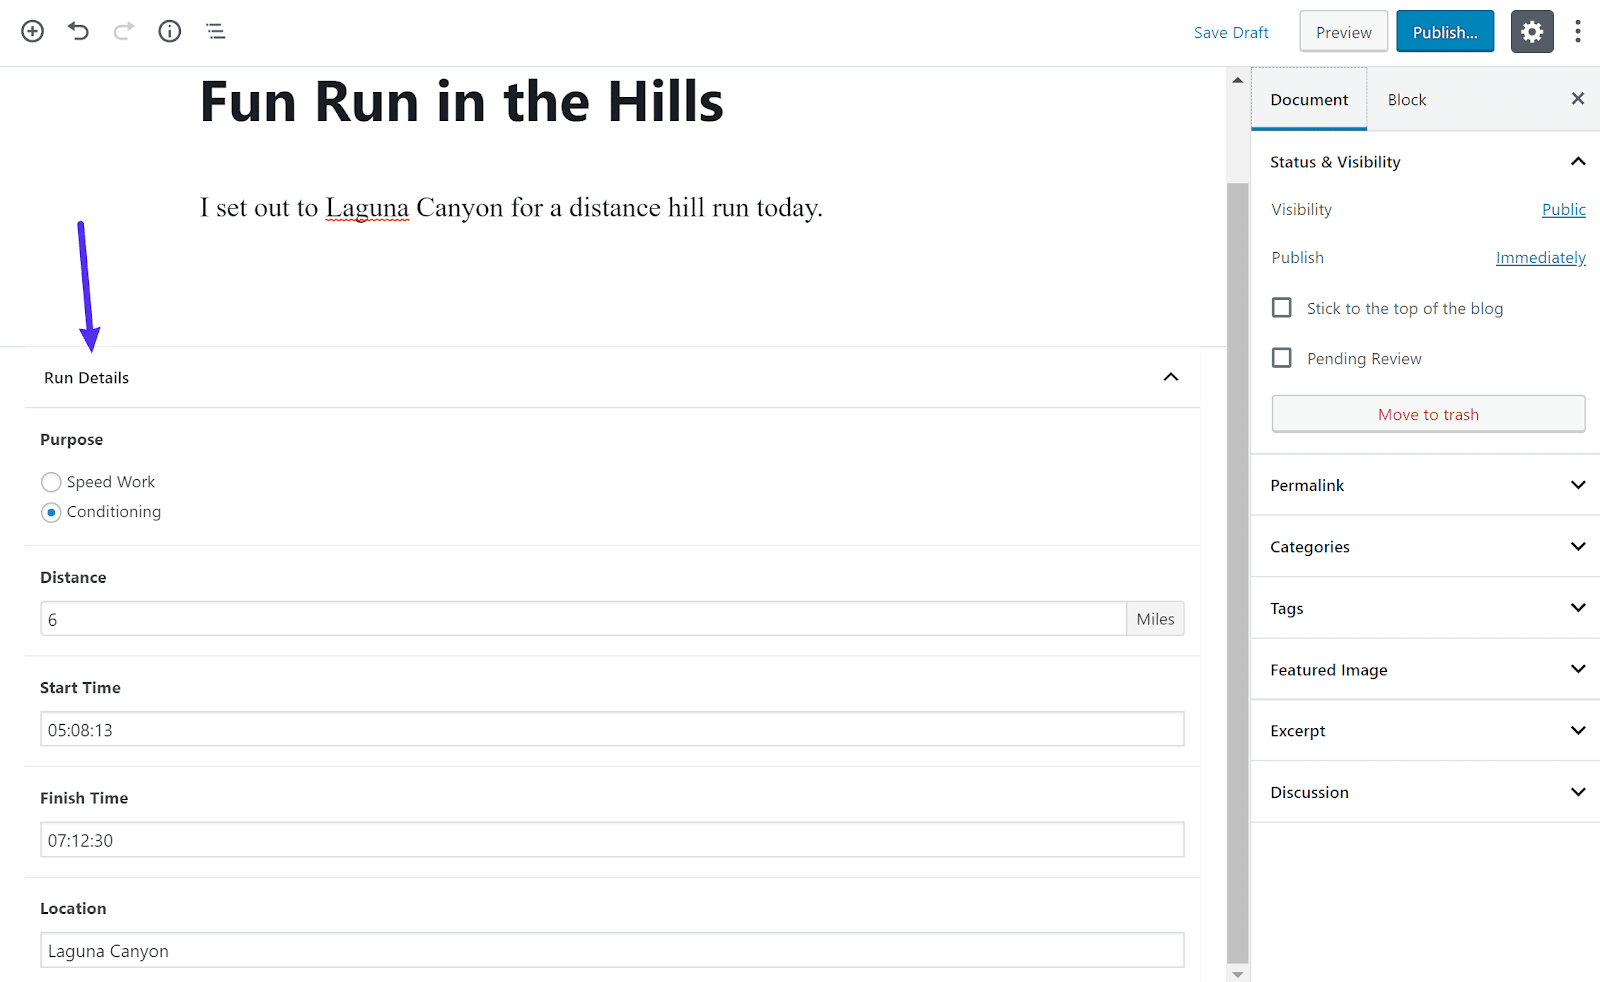
In this example, suppose you have a blog about running. You really enjoy running and you want to share your daily work with your readers. Specifically, for each blog post, you want to share one run:
- Purpose - suppose you have two different types of activities: Google working speed and online air conditioner.
- Distance - how long is your runtime.
- Time to start - when you start running.
- End time - when you finish your run.
- Place - where your run takes place.
To collect that information, you'll want to add five custom fields.
It is important to note that the guidelines you will learn in this advanced Custom Field guide apply to all use cases. We only choose a specific example because it helps to have a tangible example to connect.
We will divide this tutorial into two parts:
- How to add and manage your custom fields on backend.
- How to display custom field information on the frontend of your website.
1. Create a new field group
When you have installed and activated Free version of Advanced Custom School from WordPress.org , go to Custom Fields> Add New to create your first Field Group.
As the name suggests, an online group field group is a group of one or more custom fields displayed together in your WordPress dashboard.
In this example, you will create a field group that contains five custom fields.
Name your field group and then select its location. In this example, we want to display these custom fields for regular WordPress blog posts, so you can leave it as the default Post.
However, if you want to display your custom fields elsewhere, like next to them custom post type or with sorting, you want to change this. You can also set up multiple rules to display your fields in multiple locations:
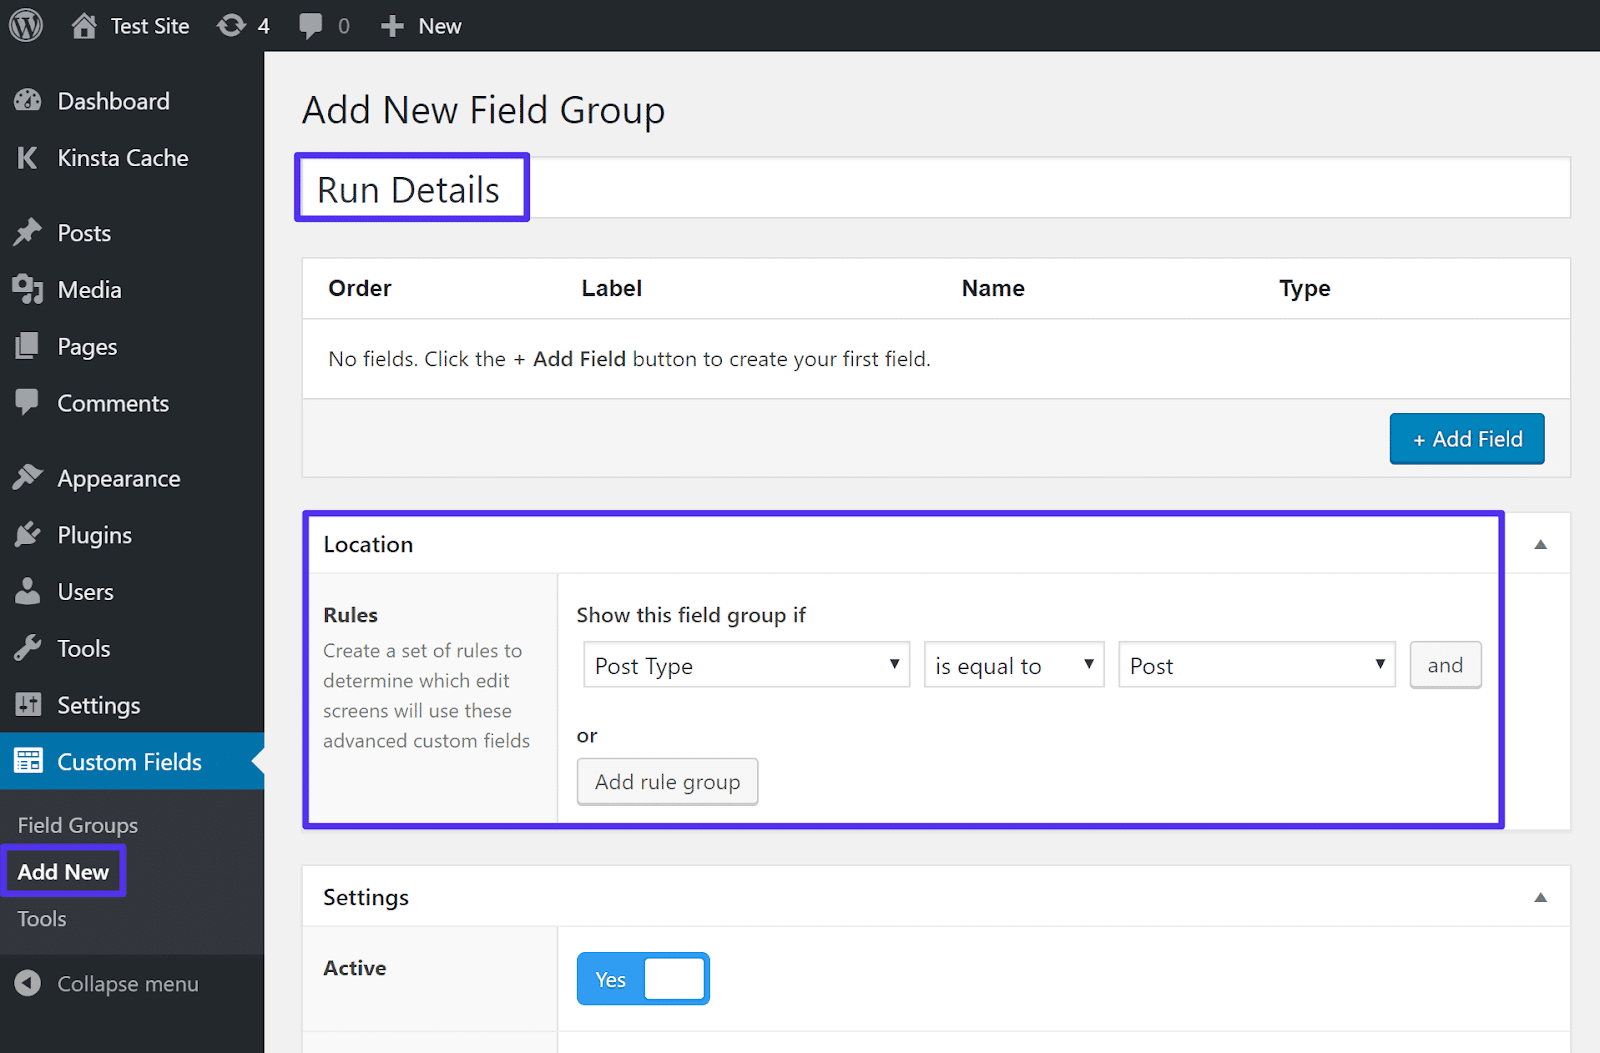
Create a new ACF field group
2. Add custom fields
Next, click the + Add field button to add your first custom field:
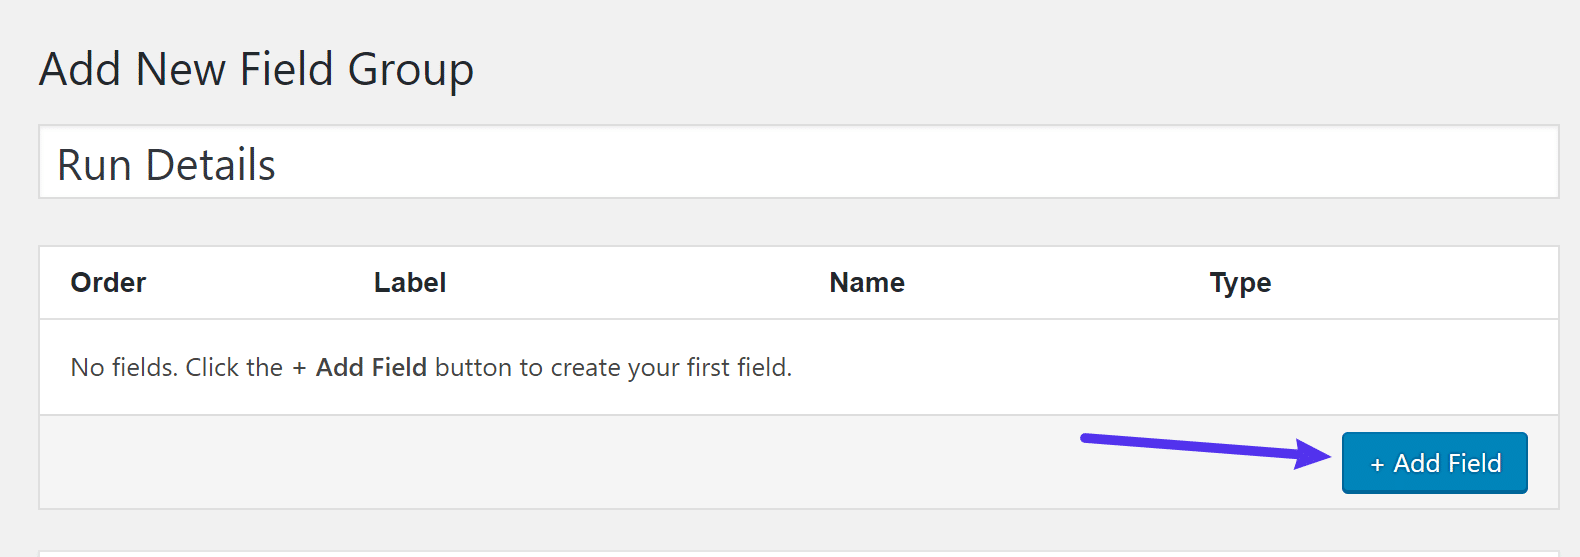
Add a new field
This will open a lot of options, but you don't necessarily have to fill in everything.
The two most important options are:
- Label Field - this is what appears in the editor. It will also be used to create the Field Name, which is the name you will use in the code. You do not need to change the field name (although you can if you need it).
- Type of field - this is the type of information you want to collect. For example, you want the Number field to collect digital information or the Email field to collect email addresses.
For this first field, you want the Radio Button field type:
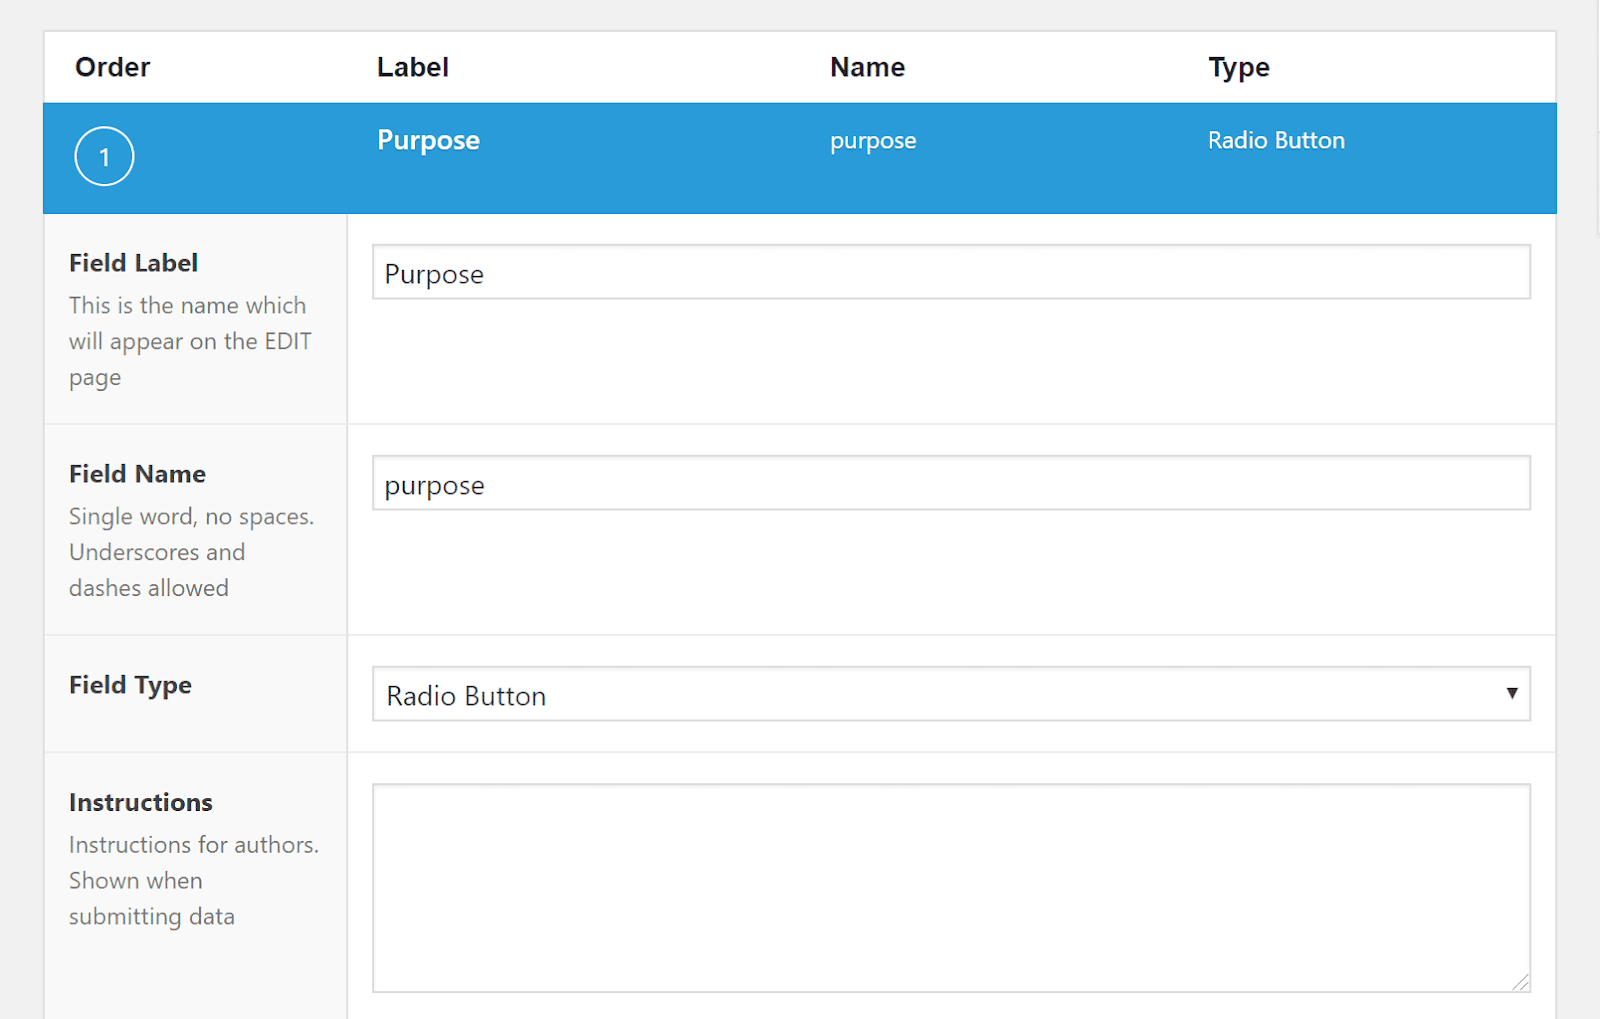
Configure a field
Further down, you can enter radio button selection options in the Options box:
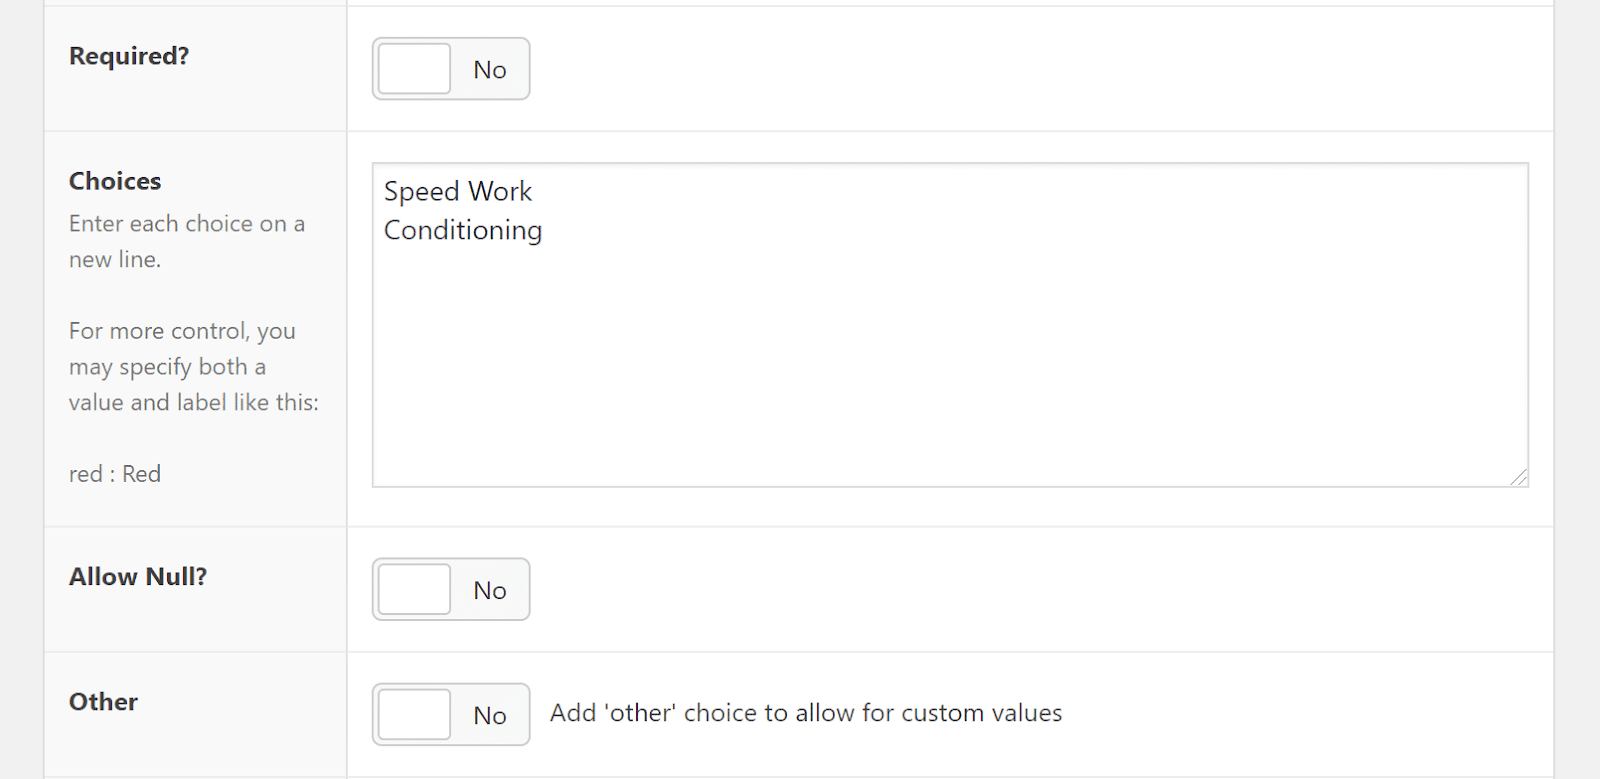
Enter radio box options
There are also a number of other options you can make, such as whether a field is needed and the default value. Please configure these according to your needs.
Consider another example: custom fields to collect running distances. This time, you want the Number field type:
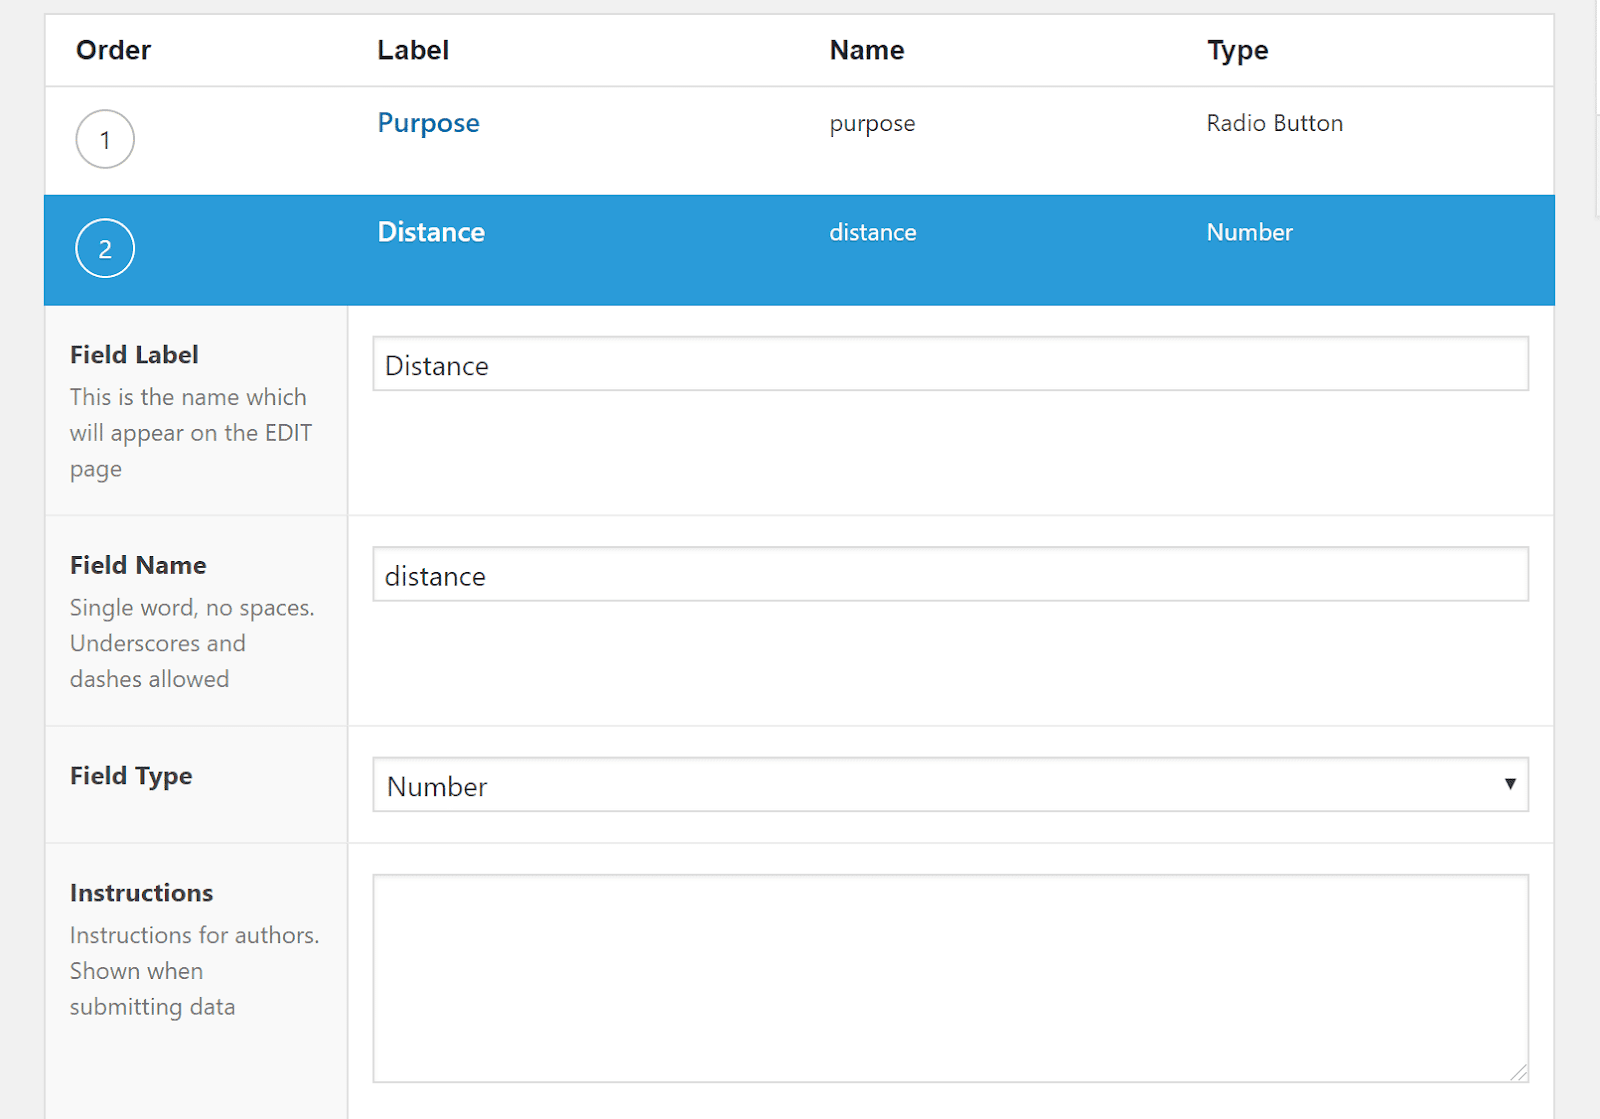
Create a numeric field
You can also make things a bit more user friendly by selecting Append distance units. And if you want, you can also add authentication with Minimum Value and Maximum Value. For example, maybe you won't run 1000 miles (and if you do OM OMG, you will be the last Forump Gump)!
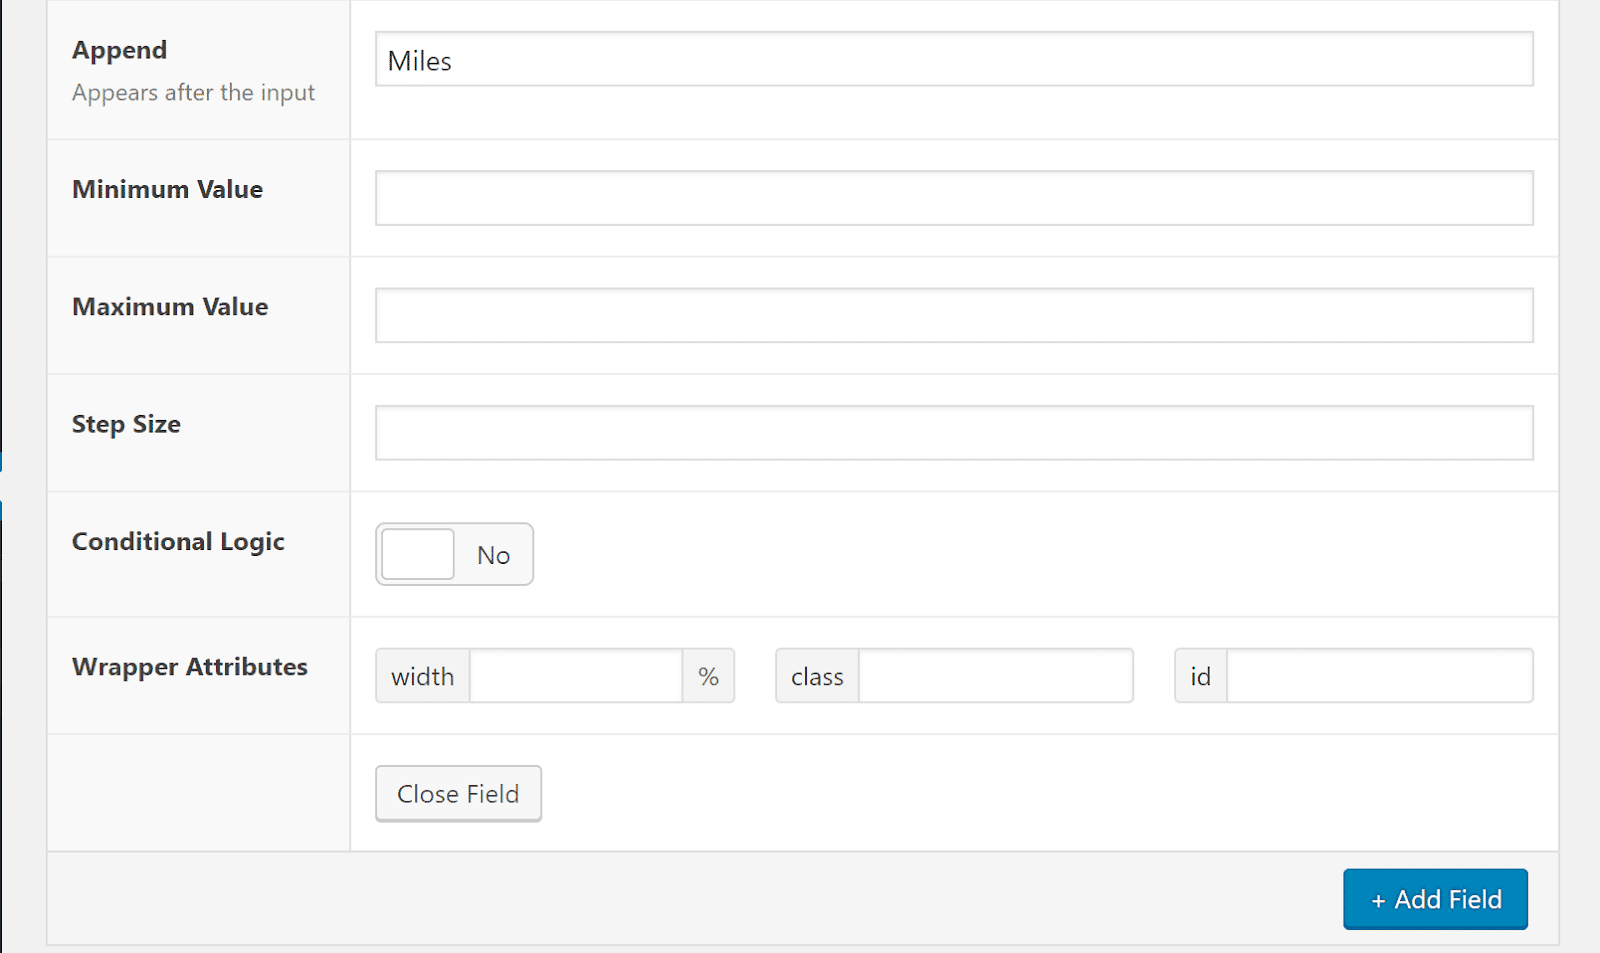
Add field settings
Just repeat the process for all other custom fields you want to collect. When completed, it should look like this:
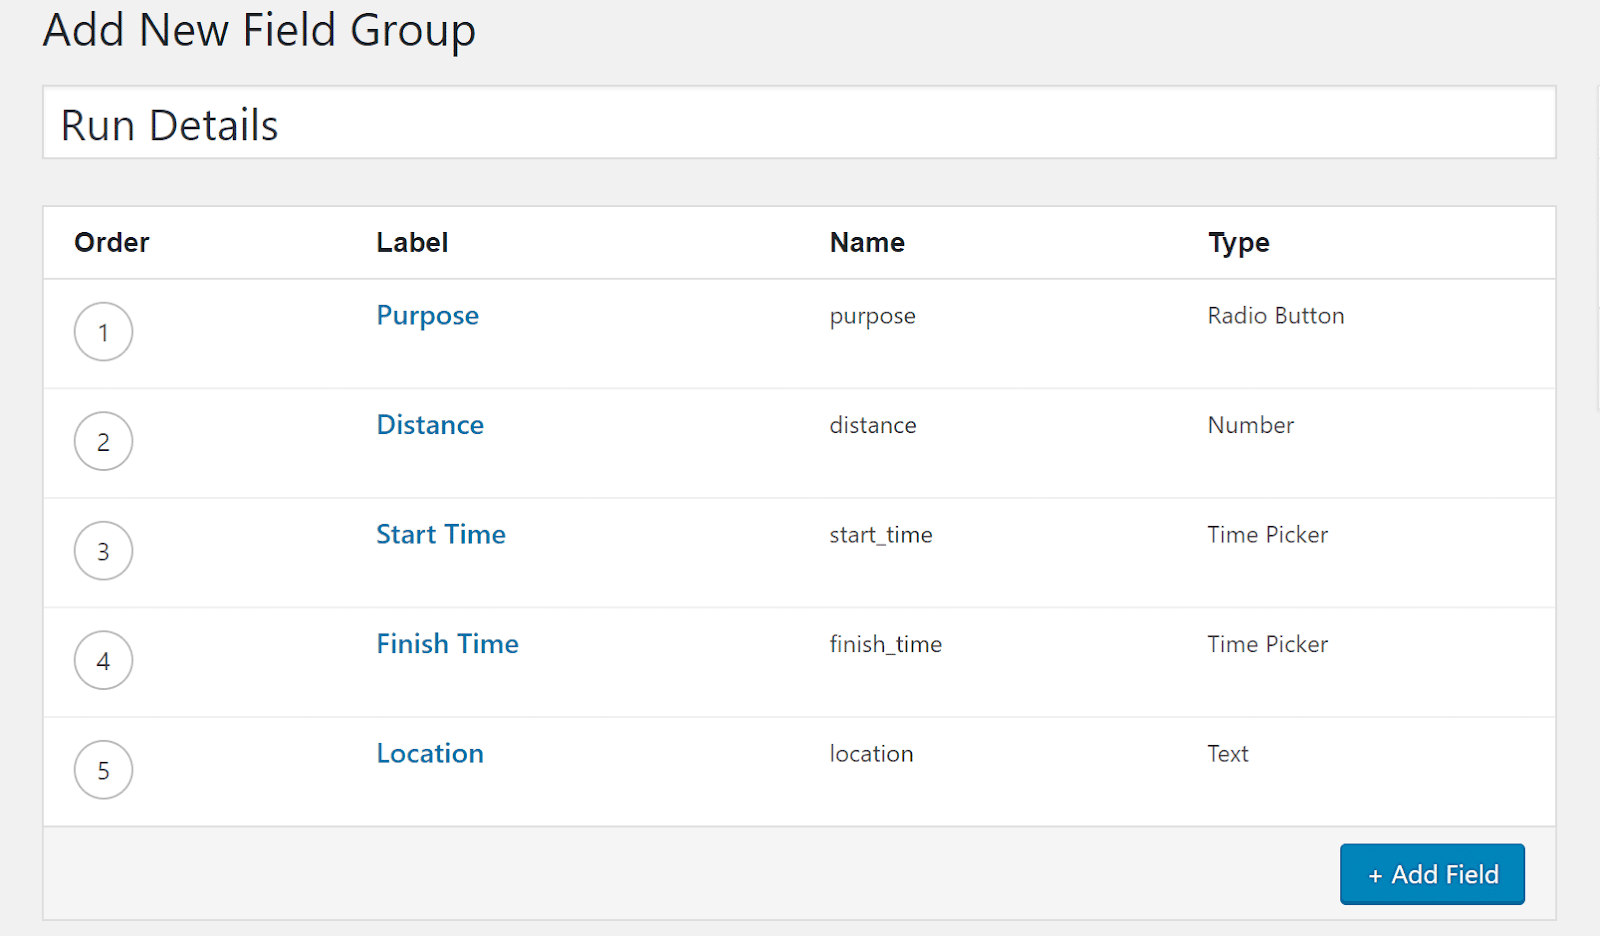
5 different ACF schools
3. Configure settings and publish
To complete everything, scroll down to the Settings box. Here, you can control how your fields appear in the editor WordPress .
Most of the time, you can leave these as the default. But feel free to change everything if you want. For example, you can choose to display your custom fields above the regular WordPress editor:
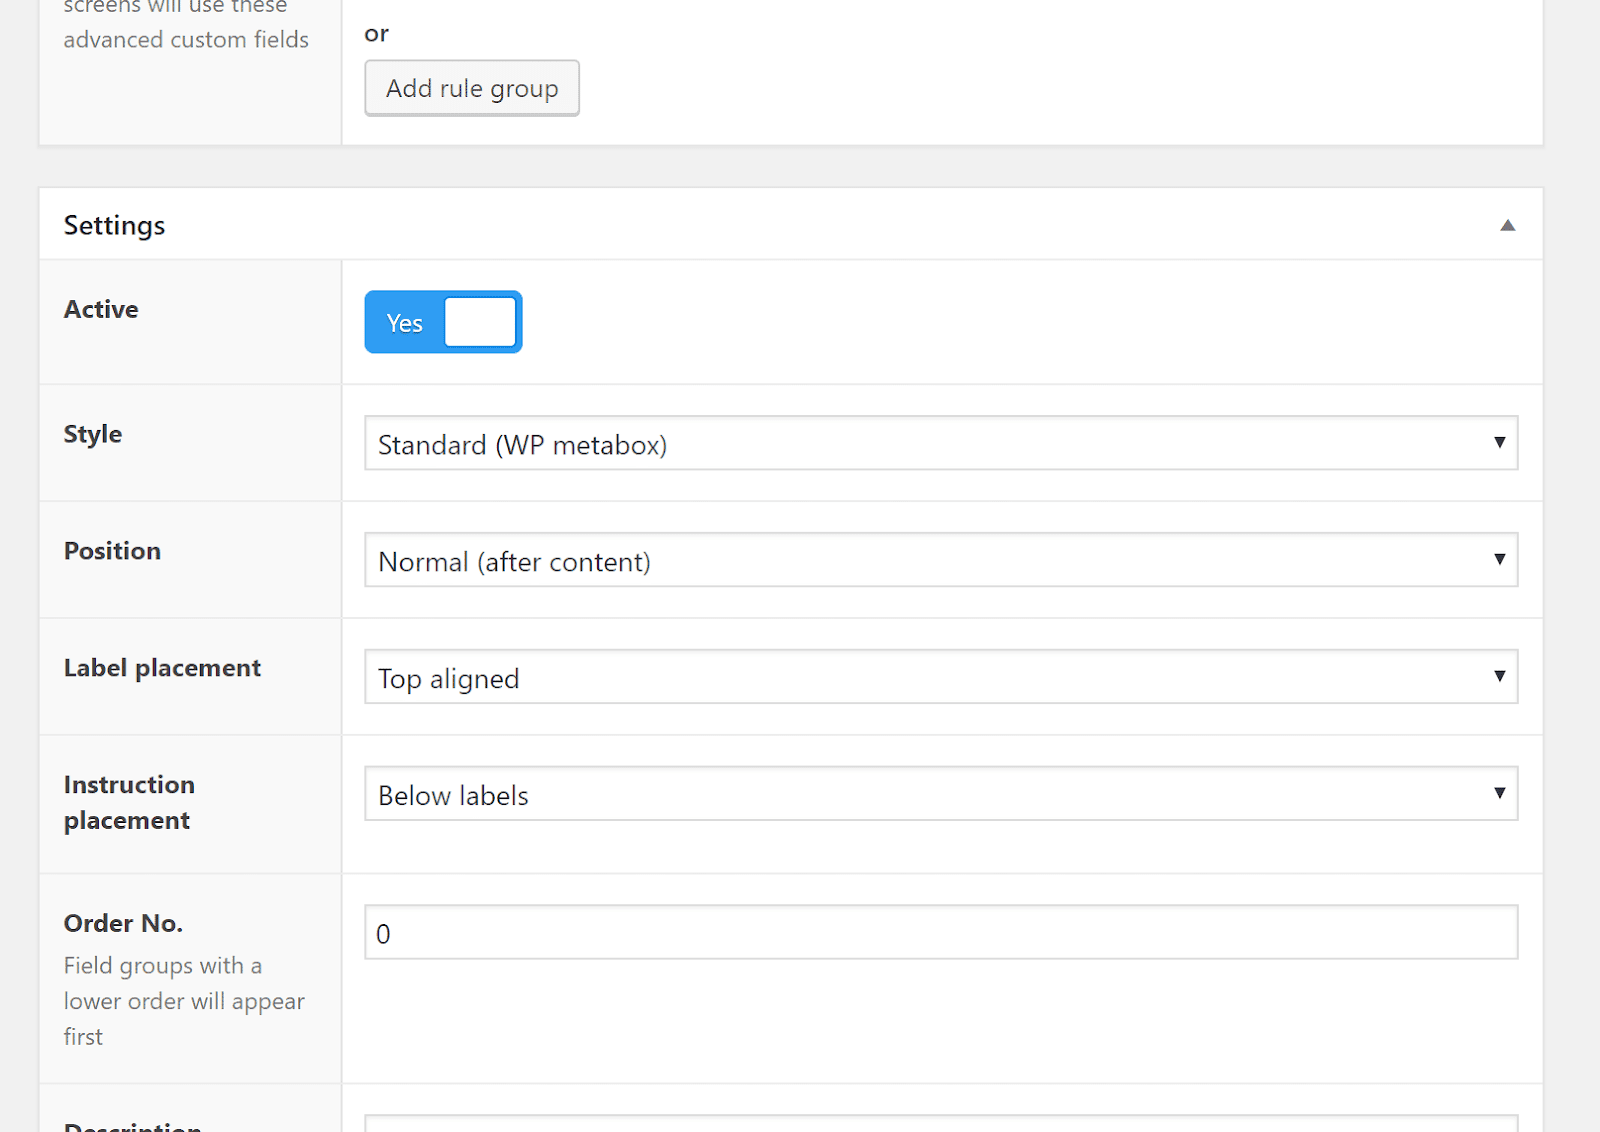
Configure ACF field group settings
Once you've made your selection, publish your field group to make it exist.
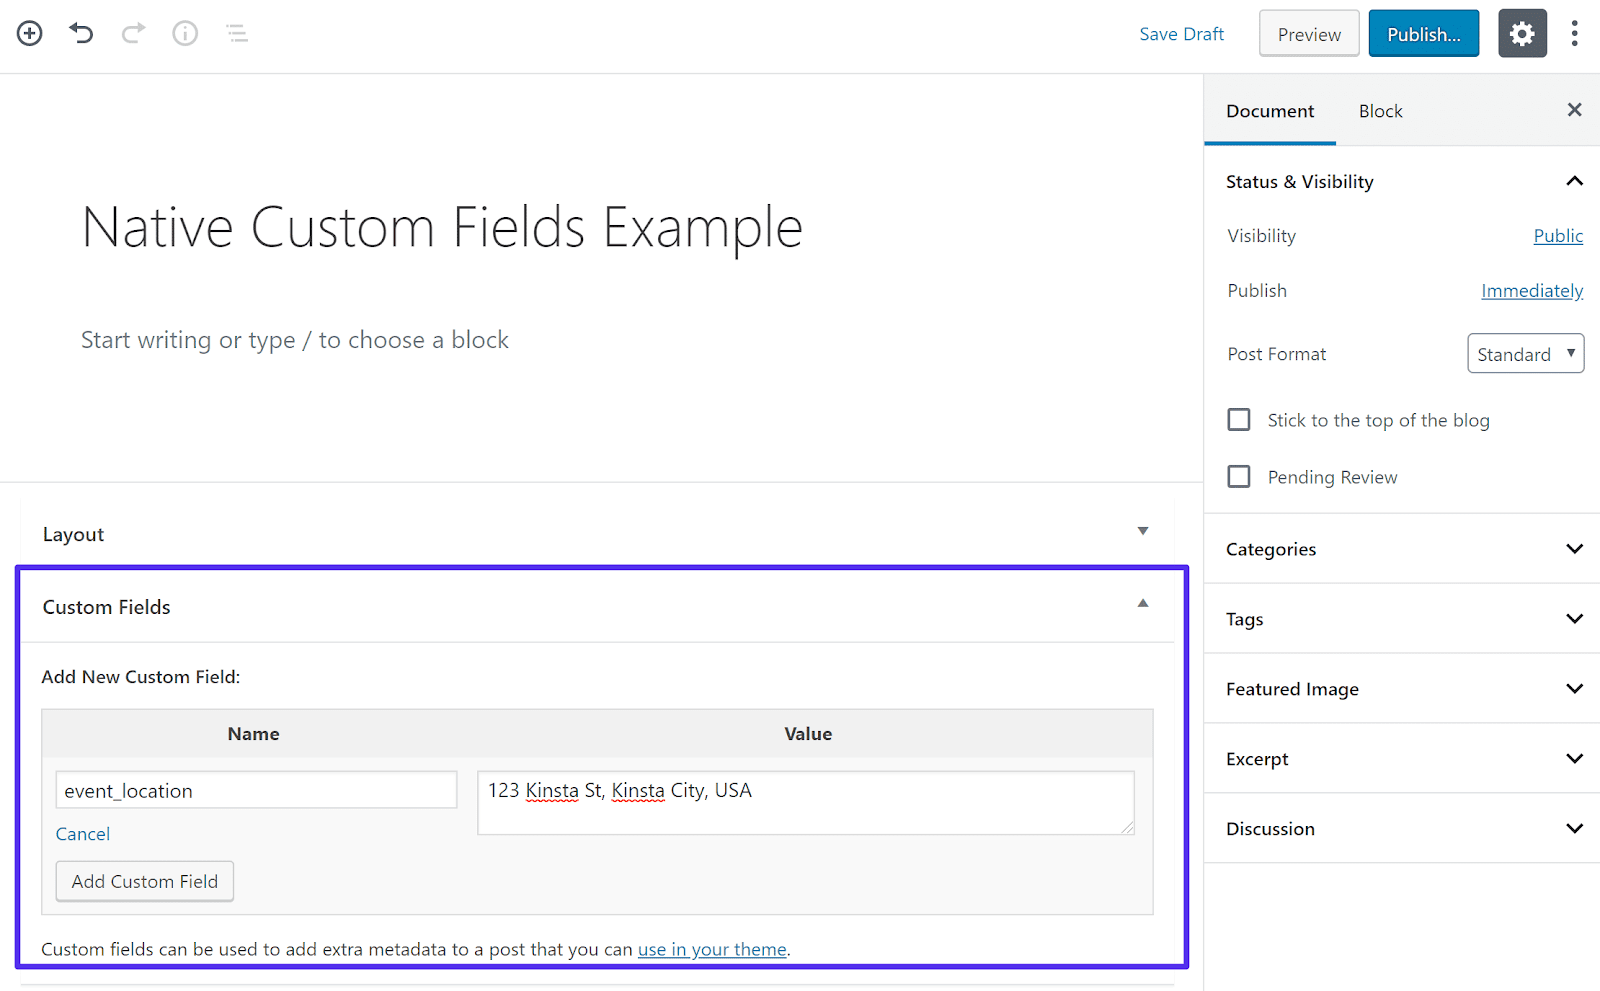
4. Add some information in the WordPress Editor
Once you've published your field group, you'll see your fields appear as you go to create a new post.
By default, they will appear together below the editor in both the classic TinyMCE editor and the new block editor:

Advanced custom fields in the block editor
The information you enter here will be stored in your site's WordPress database for easy access (you'll see that in the next section of our Advanced Custom Field guide).
Explore conditional logic
Before we move forward, let's quickly take a detour.
See, one of the reasons why Advanced Custom Fields is so popular is because of all the interesting implementations it allows.
And a powerful option here is Conditional Logic, which allows you to show / hide fields based on how a previous field was answered.
Let's look at a quick example of how this works
Say you want to blog about your food, trip, or anything other than running. When you write about a topic that doesn't run, it makes no sense to display custom fields for activity information, right?
What if, instead of automatically displaying all the custom fields you just created, you could add a custom field that says Is this Post running?
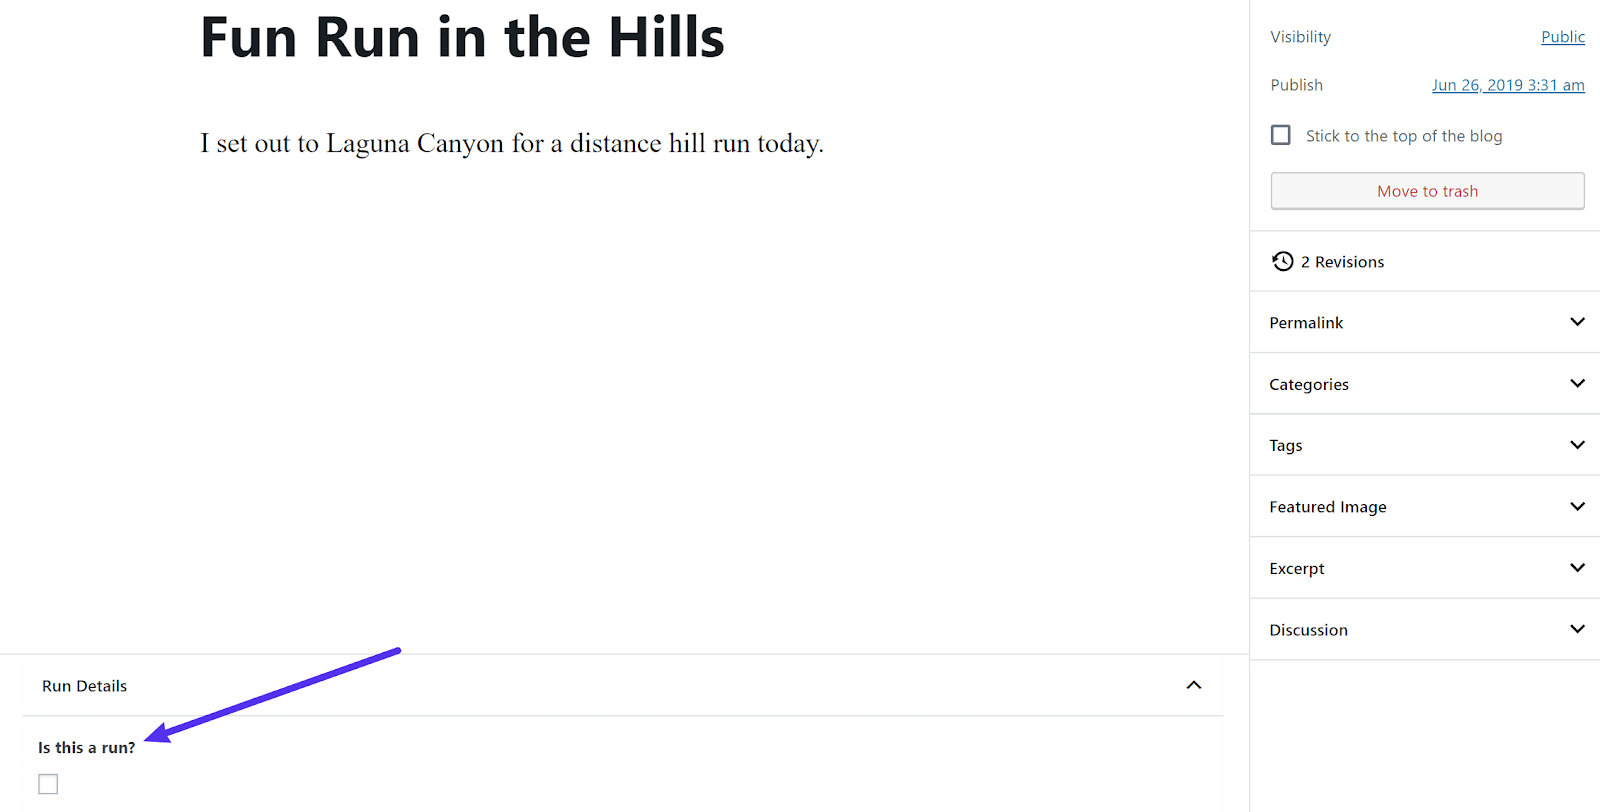
For example conditional logic
If you check the box, then the running information fields appear automatically. If you do not select it, they will be hidden:
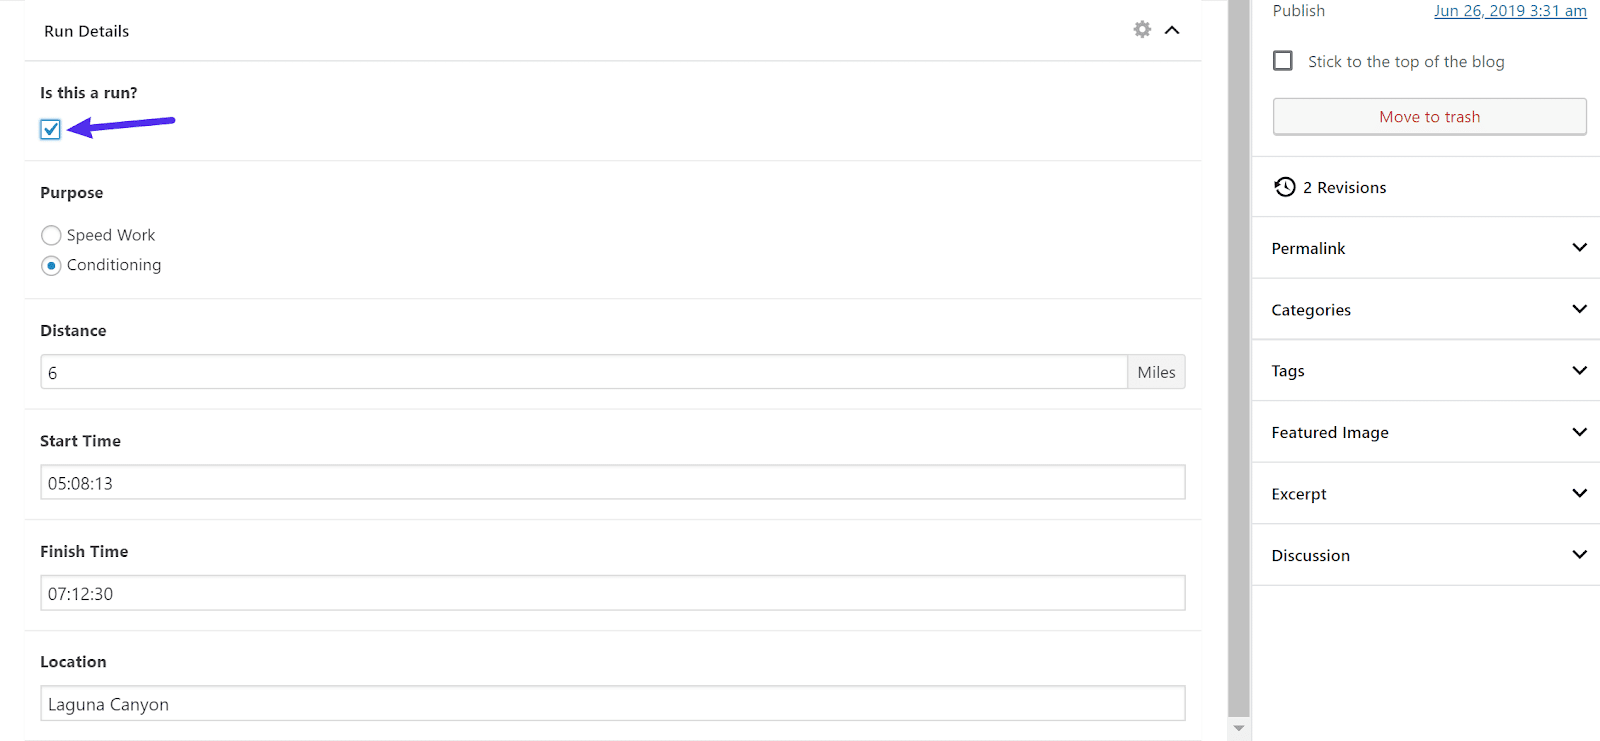
Other fields display when selected
That is what conditional logic allows you to do!
To set this up, you'll edit your field group and add a new True / False field for this name Is this running?
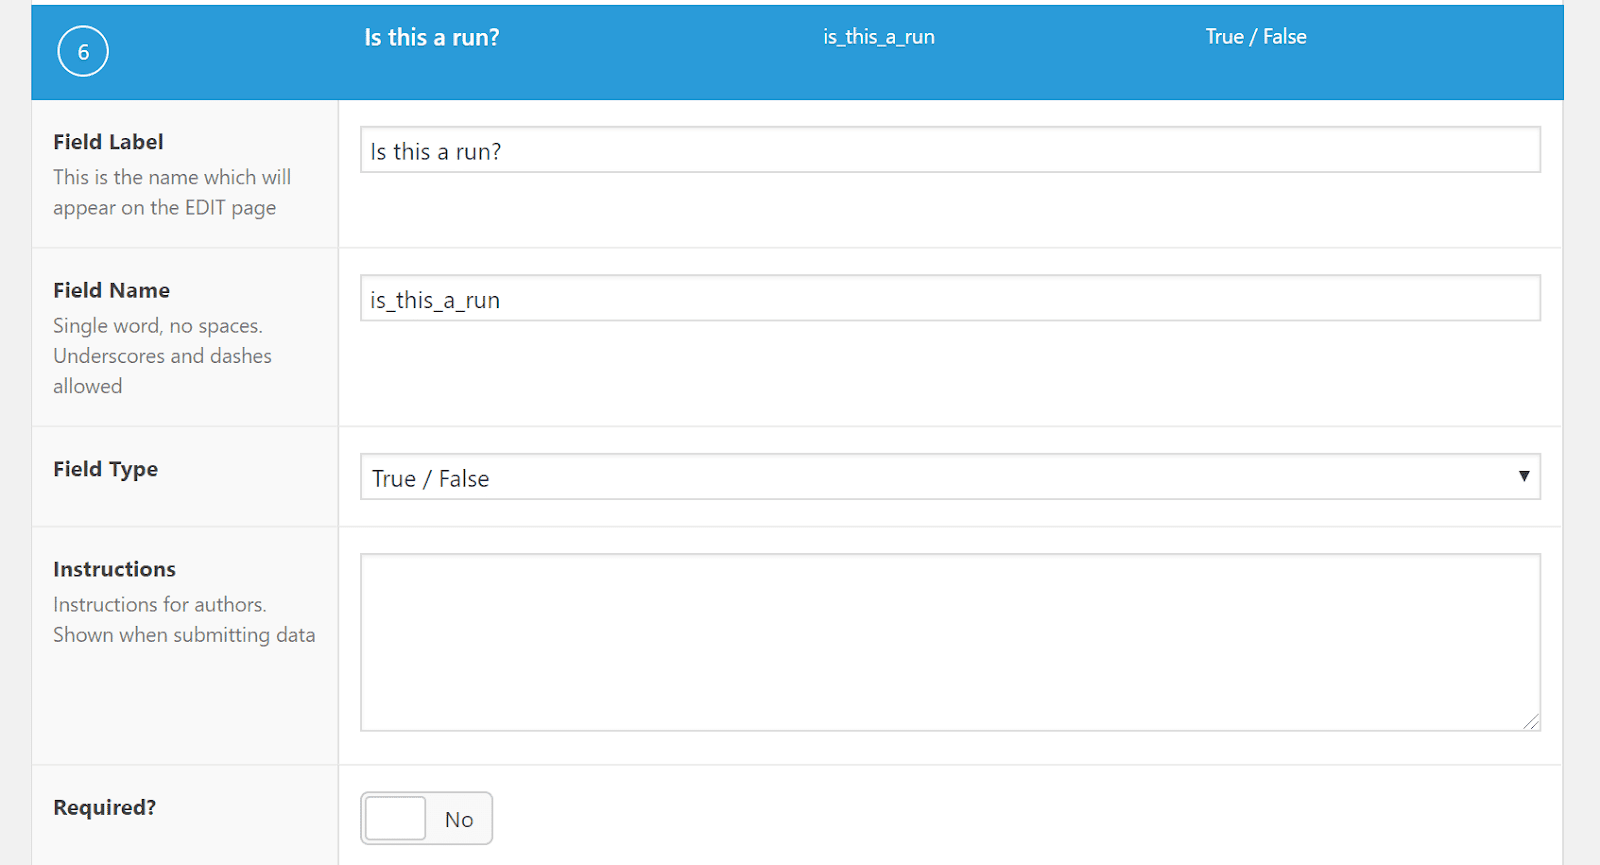
Add a True / False field
Then you would edit the existing fields and turn on Conditional Logic so that each field will only show when this is running. field to be tested:
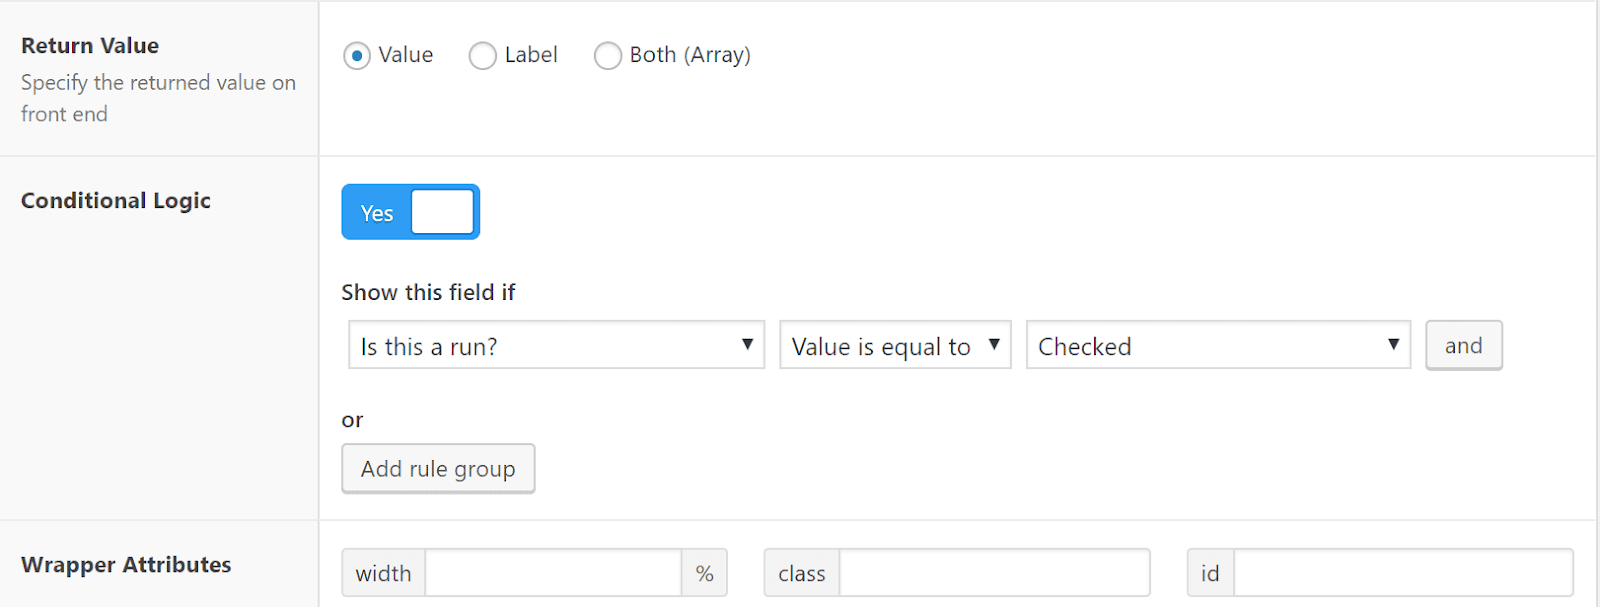
Add conditional logic to other fields
How to display advanced custom fields on Frontend
Ok, we're halfway through the Advanced Custom School journey. You can now add information to your custom fields, associate it with the relevant post type and store it in your database.
However, there is still a potential problem: information from your custom fields does not appear anywhere on the frontend!
That is, although you have added some custom fields to the editor for your blog post, your blog post still looks like a normal blog post on the frontend:

There are no custom fields on the frontend
Please fix it.
There are a few different ways you can display Advanced Custom Field data on the entrance of your site. The exact method you choose will depend on your needs and level of knowledge. Here are three different ways to get there:
- Sample files of your topic - this requires a bit of technical knowledge, but it's the best approach all the time, especially if you're comfortable working in the template files of theme.
- With a shortcode - this is super simple and a good option if you only want to insert custom field data on a case by case basis. However, it requires more manual work because you will need more Short codes on each post.
- With Elementor Pro - this is great because it completely eliminates the need to work with PHP, but this is a high-end product and that also means you will need to use Elementor Pro for creating templates of yourself.
You can click above to jump straight to a specific method or you can read through them all. It's up to you
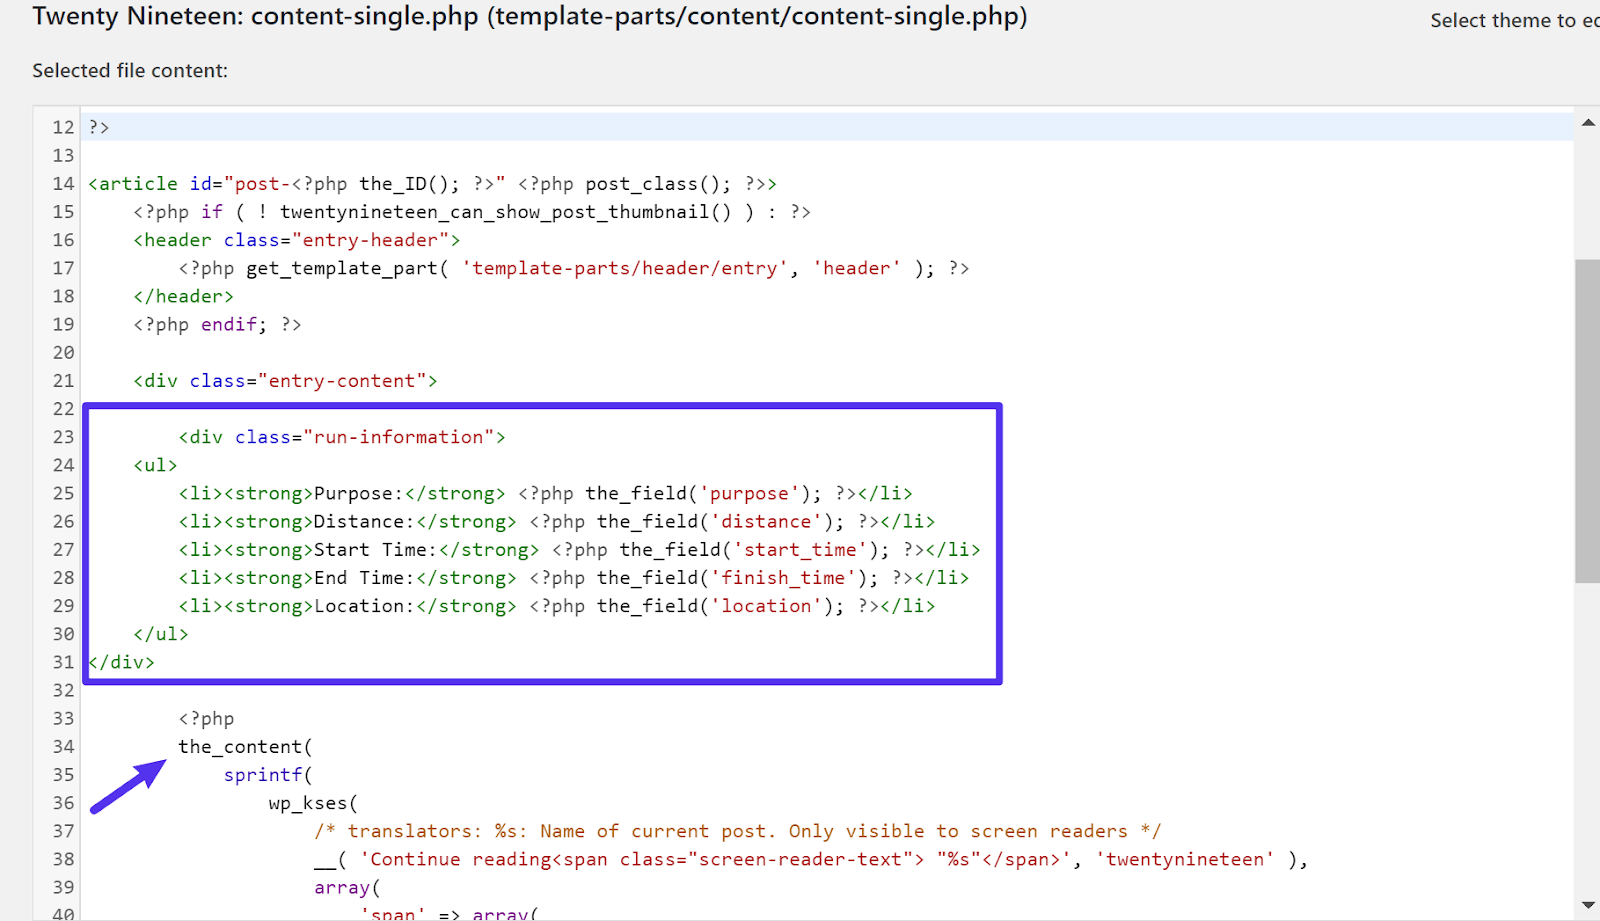
How to add advanced custom fields in the topic template file
The first way to display your custom field information is to add the Advanced Custom PHP functions directly to your child theme's sample files.
This is a bit advanced as it requires you to dig into the topic template files, but it ensures that your custom fields will automatically show up in the same location each time.
Specifically, you will need to edit a unique template for the type of post in question.
For a regular blog post, this is single.php. Or, some topics divide everything into sample parts. For example, for the TwentyNineteen theme, you really need to edit the content template-single.php section.
If you feel lost here, you may want to use another method.
Once you have found the topic template file for one of your posts, you can use the_field () function of the Advanced Custom Fields to display its information. For example,
the_field (‘FIELD_NAME’); ?>
Find out more here about it.
For example, to display the purpose field of the purpose you will use
the_field (‘purpose’); ?>
You can find the school name when you edit a field group:
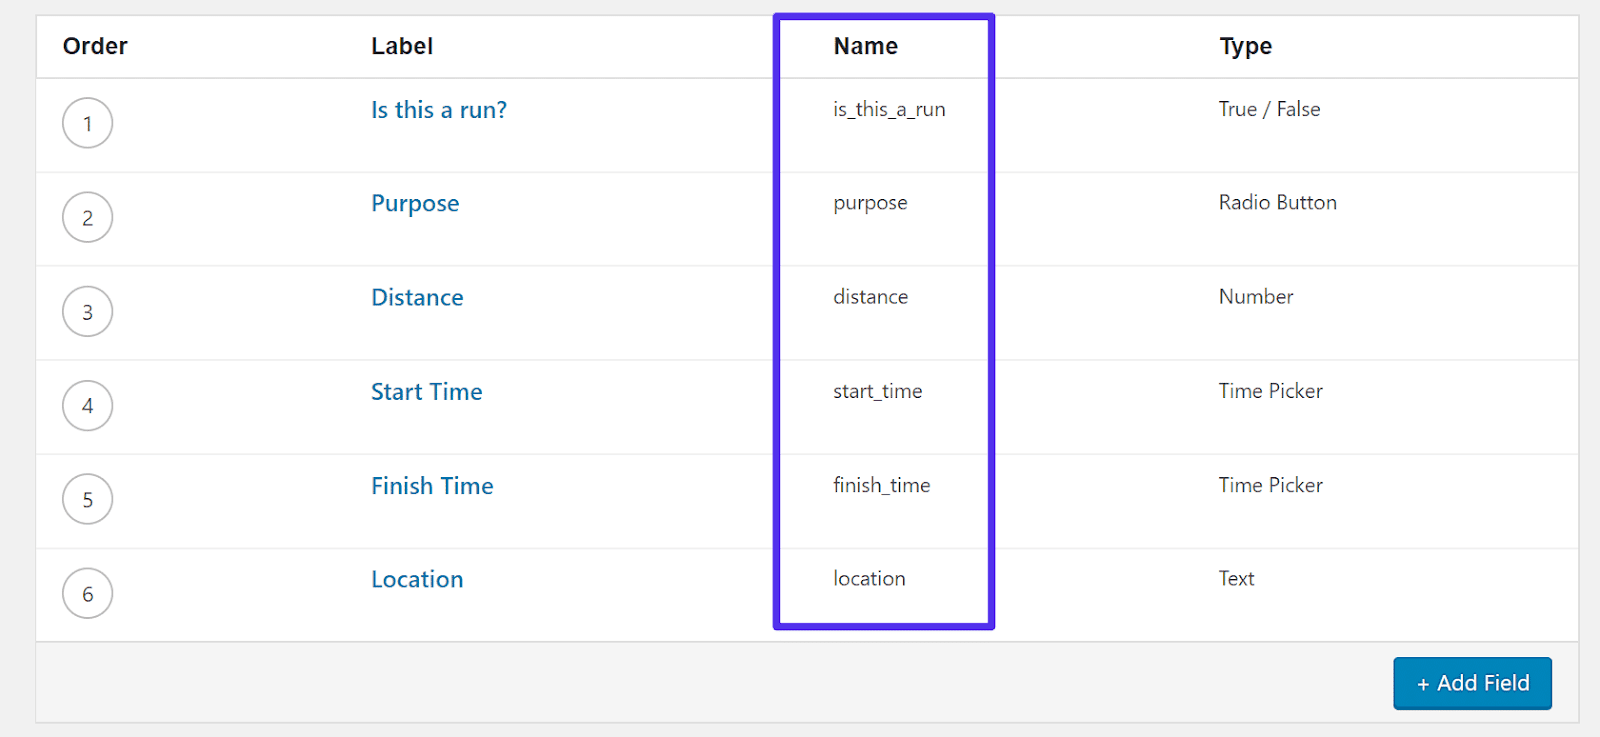
Where to find ACF field name
So when combining a small HTML markup with PHP, you might get something like this to display all fields:
- Purpose: the_field (‘purpose’); ?>
- Distance: the_field (‘distance’); ?>
- Start Time: the_field (‘start_time’); ?>
- End Time: the_field (‘finish_time’); ?>
- Location: the_field (‘location’); ?>
To add this content above the regular post content, you will add this content to your topic template file above the_content ():
Where to add the code in the topic template file
And now, after refreshing the blog post, you can see custom field data above regular WordPress content:
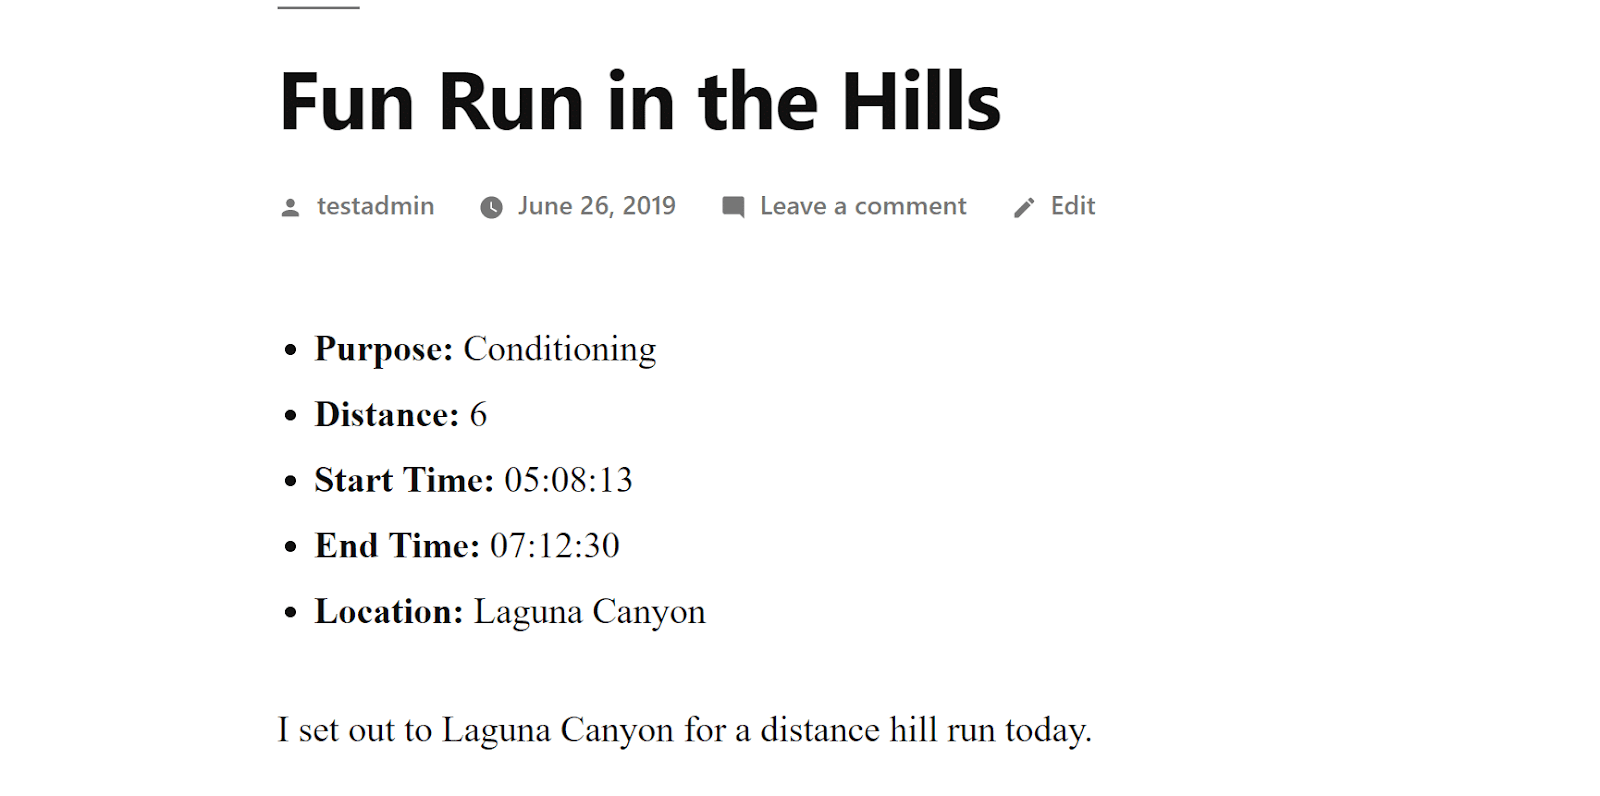
You can now see the fields on the frontend
To find more about, see the full documentation of Advanced Custom Fields .
How to display advanced custom field data with a short code
To make it much simpler to display the data of your custom fields, you can also use shortcodes. The downside, however, is that you will need to add shortcodes each time you want to display a custom field. There is no easy way to automate this task.
The short code is here:
(acf field = "FIELD_NAME")
For example, if you entered this in the WordPress editor:
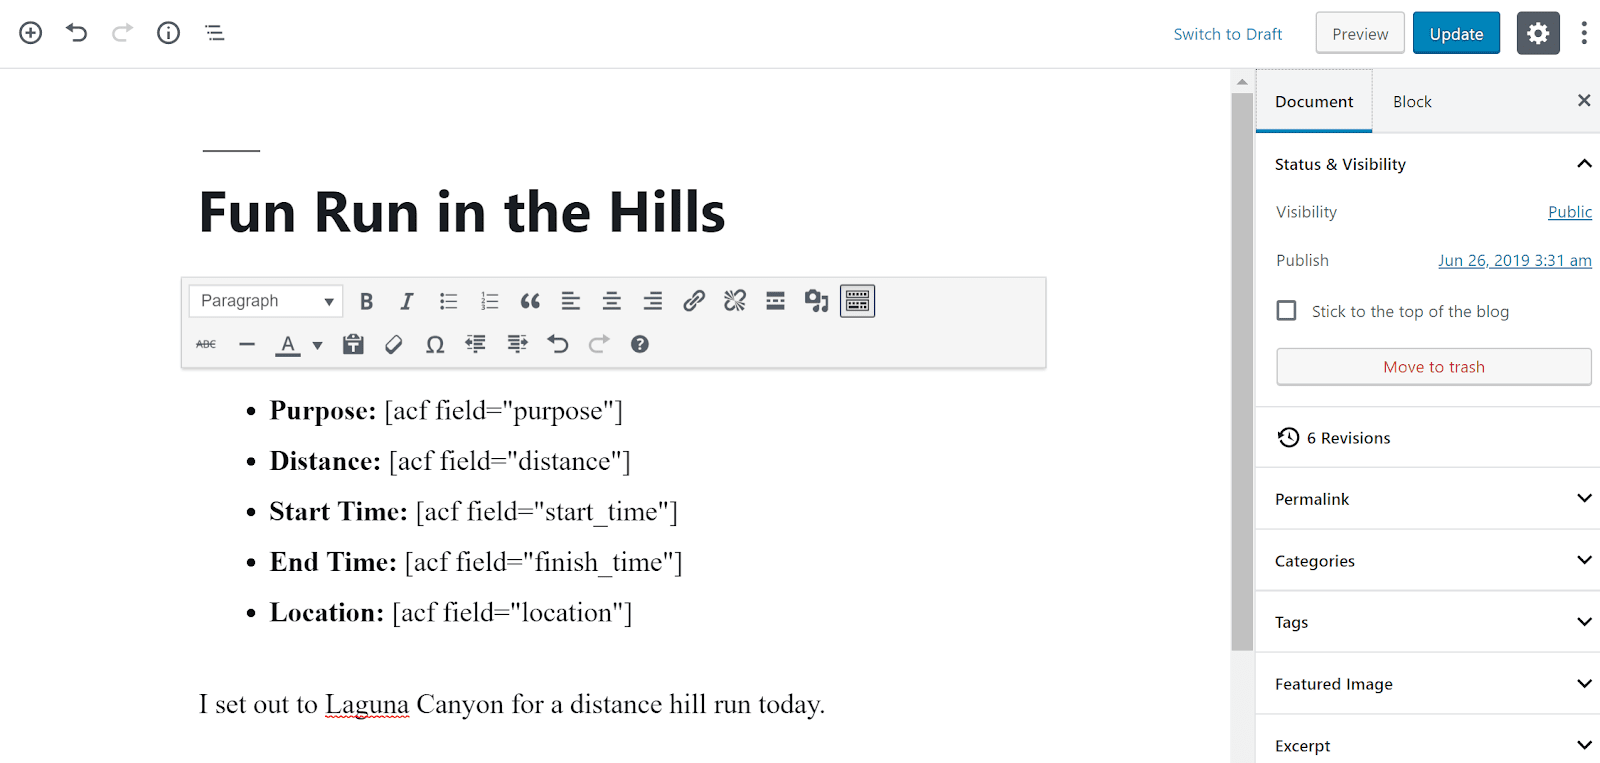
Use shortcodes to display ACF data
The frontend of your site will then look exactly like the previous topic template method:
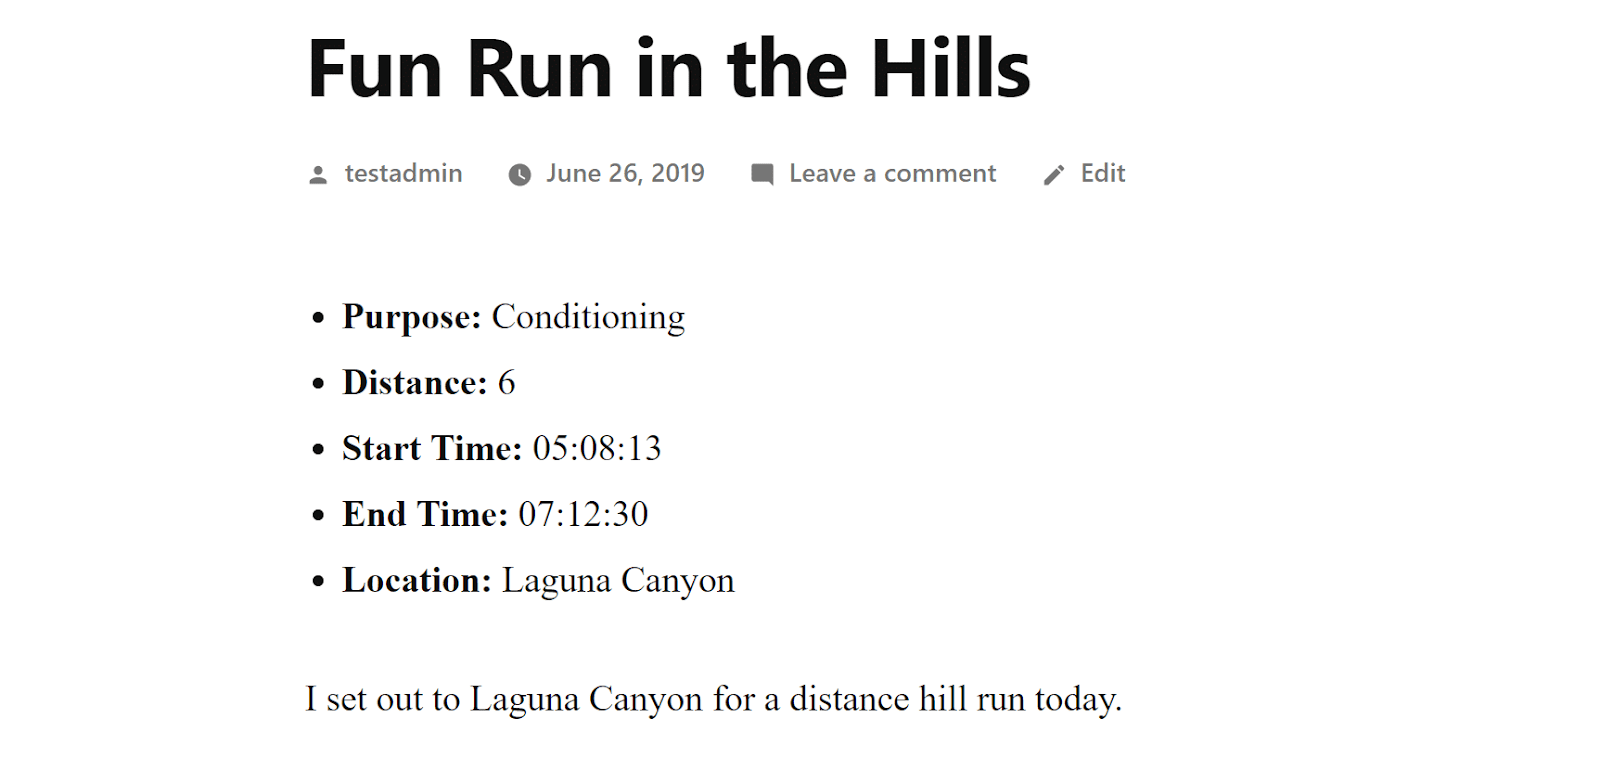
The shortcodes look identical to the topic template file
How to display advanced custom fields with Elementor Pro
With Elementor Pro, a paid add-on, you can also build theme template files, including the option to insert dynamic custom field data from Advanced Custom Fields into your design.
This is a great option if you want the flexibility to automatically include custom field data in your templates, but don't feel comfortable doing code editing directly for topic templates.
To get started, go to Template> Theme Builder and create a new Elementor template for your post Menu:
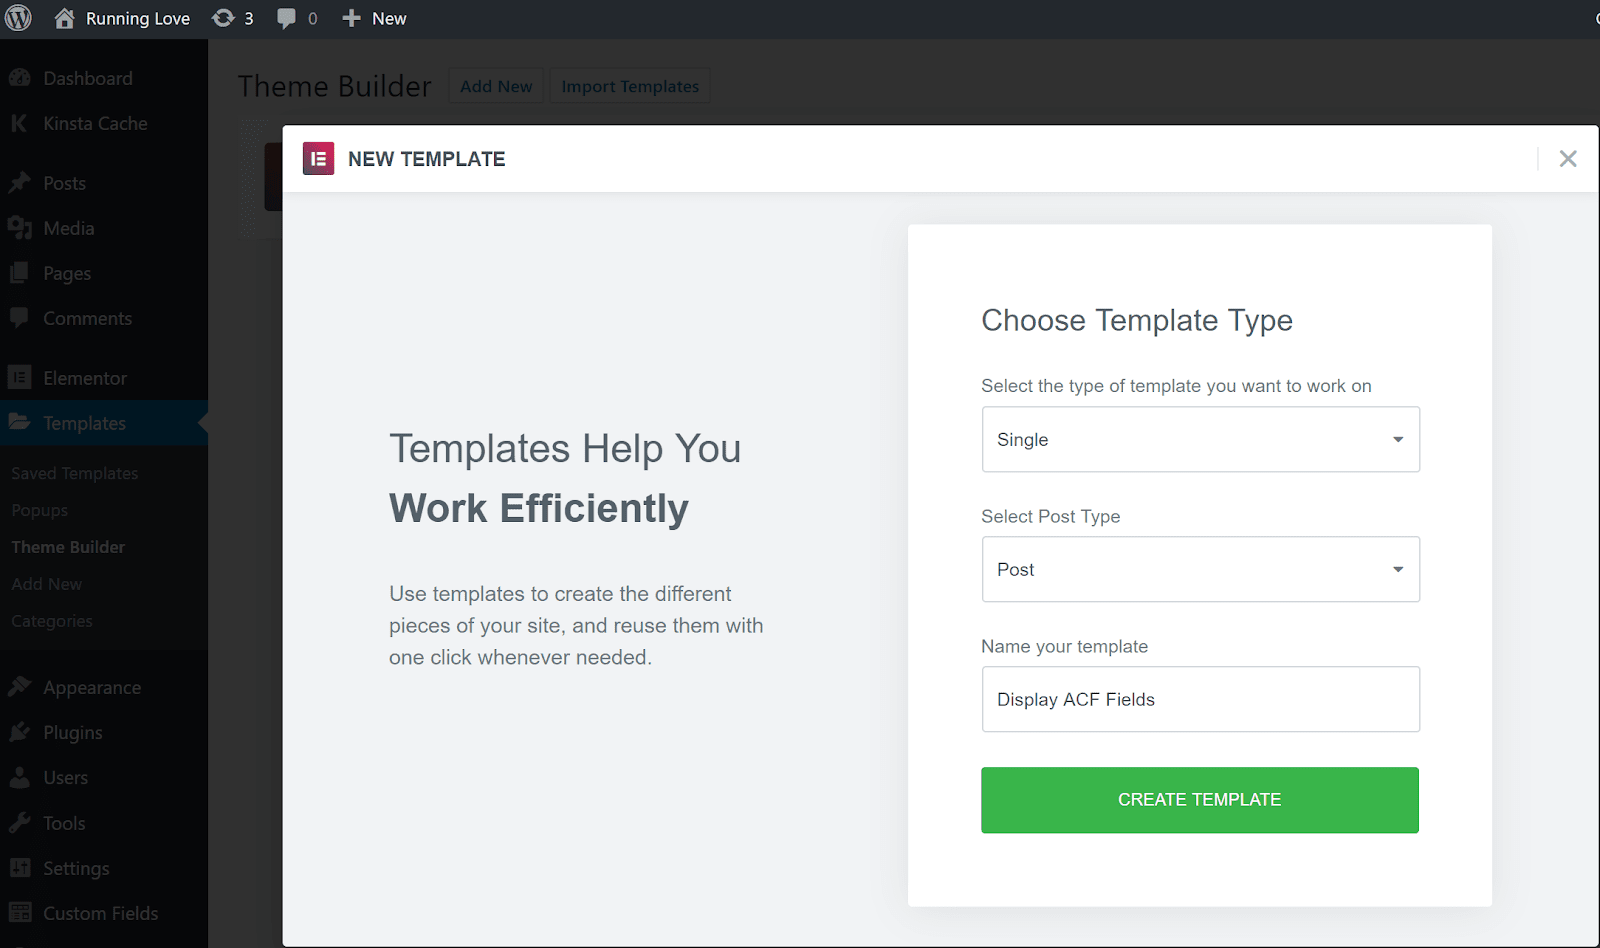
Create a new Elementor pattern
You can add regular Elementor widgets for your Post Title and Post Text. Then, to display custom field data, you'll add the usual Text Editor gadgets. The only difference here, instead of editing text, you would choose the Dynamic option:
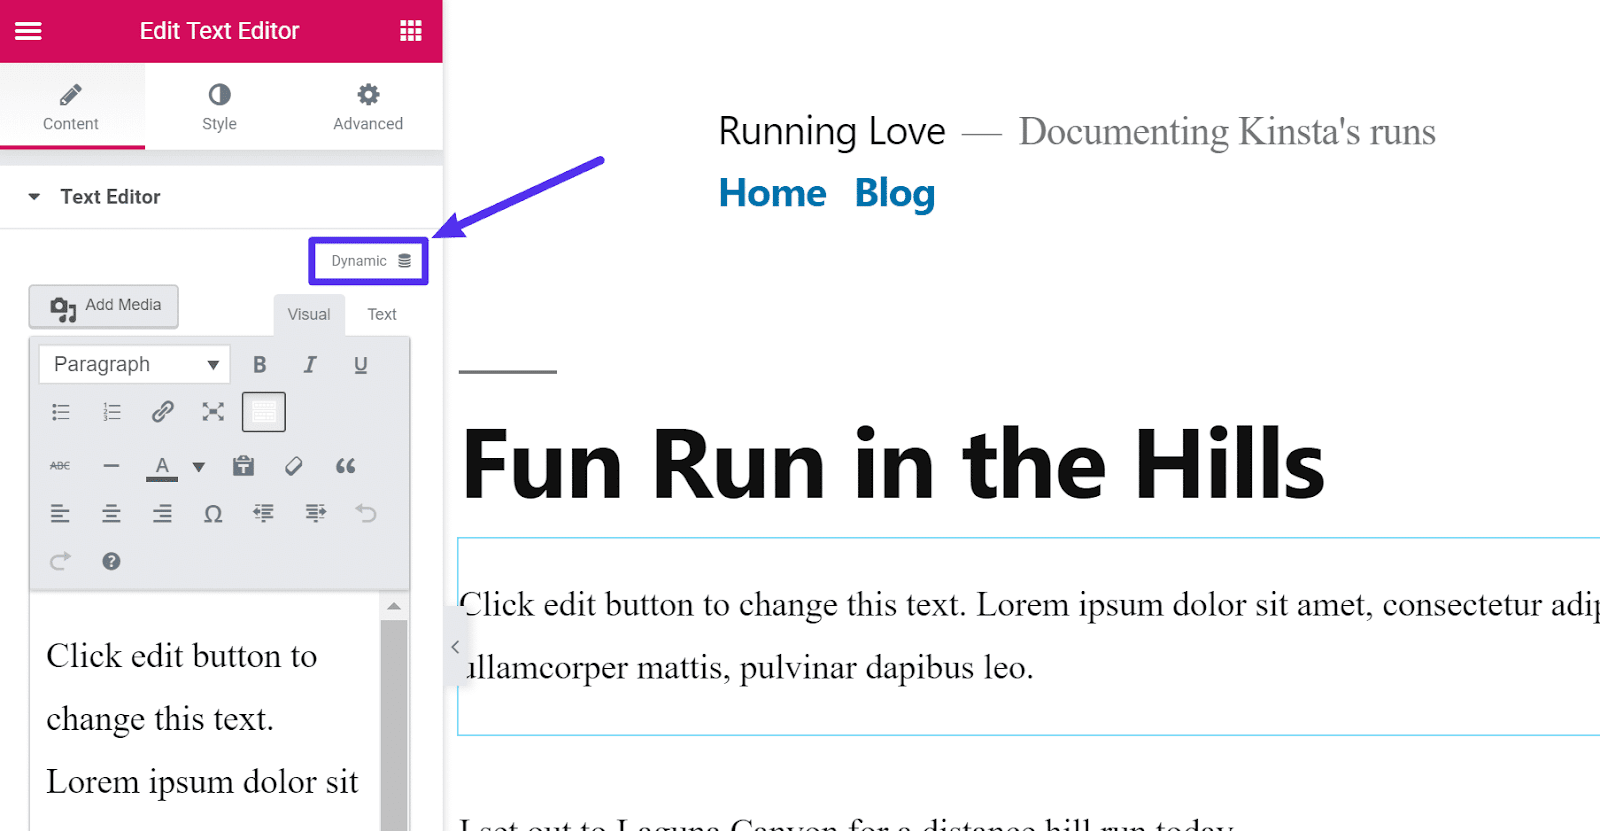
Optional Elementor Pro aggressively
You can later select ACF Field from the drop-down menu:
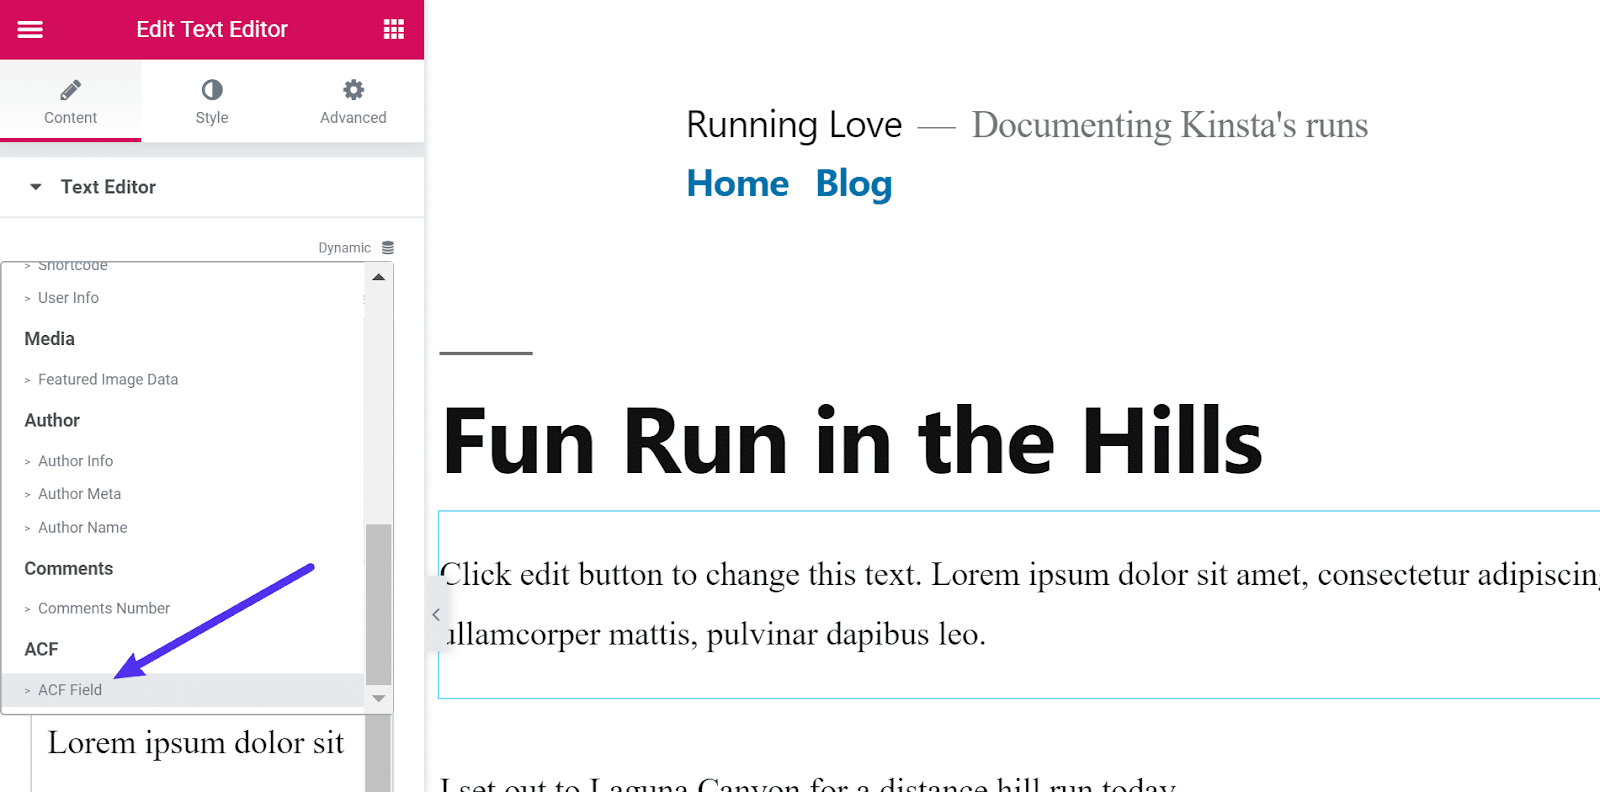
Select ACF Field
From there, you can select specific fields that you have added with Advanced Custom Fields:
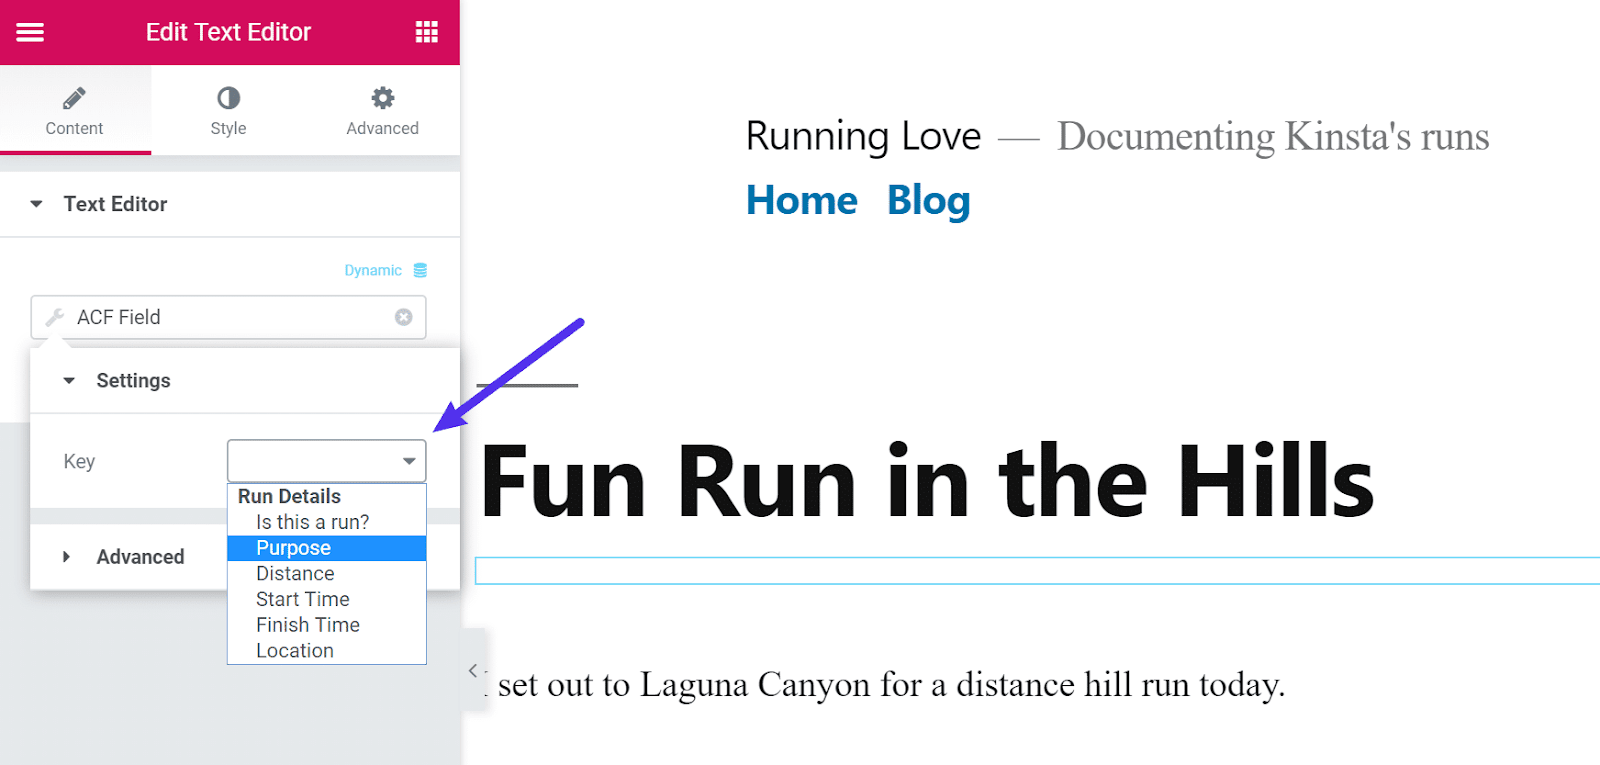
Select the specific field you want to display
And you can also use the advanced accordion tab to add or add information, allowing you to add labels and units:

Prepare or append information
Easy, right? Now just repeat for the other custom fields!
Summary
Using Advanced Custom Fields, you can enrich your blog pages and posts with more data and information with an easy-to-use solution. Plus: you can start collecting additional information for any content on your site and then display that information on the entrance for your visitors.
To do that, you have 3 options:
- Sample file of your topic
- With a short code
- With Elementor Pro
The knowledge you gain in this post will allow you to unlock WordPress's deep potential to build 100% custom websites that go beyond WordPress blogging roots.
The only question left is this:
What will you create with Advanced Custom Fields? Share it with us in the comments below

CEO - Founder of Compa Marketing. Specialist with over 5 years of experience in the field of Digital Marketing, SEO / SEM in Vietnam and the world.

0 Comments