Let's say you have a WordPress website, then you need to upgrade or add some features on the website and hire an outsourcing company or an outside employee to take care of this. Now you will be a little worried that maybe they should not give them the information that the hosting / server is running the website and they work on it, so it is too dangerous because sometimes we will not feel comfortable if the whole Website "life" put in the hands of others 😒.
Because if they work on the website itself, the customers will sometimes see the interface is broken, or if they work under the localhost of the developer, you will not be able to track the project progress.
If you have been in this difficult position, do not worry, in this article I will talk about environmental division techniques (Environment) for websites that are being used on large-scale companies or websites / applications. The application needs to ensure transparency and clarity in developing internal code.
Most of the programming environments are set up very complicated on separate server systems or VPS, but in this article I will guide in detail on dividing the environment on hosting using cPanel control panel, completely manual and free. Of course, if I have time, I will review some paid plugins to make the staging environment very fast.
If you hear the term "environment" is still too strange, please refer to the article Solve the programming environment Very nice of Mr. Pham Huy Hoang.
Environmental problems to solve
Before getting to the main point, I'll assume the environment I need to set up is as follows:
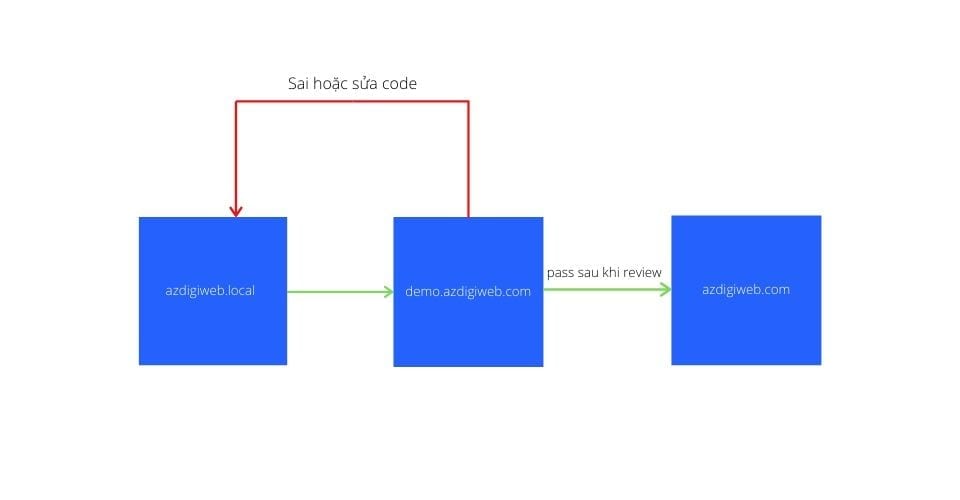
- Local Environment: Main website with domain name azdigiweb.com running on cPanel host.
- Staging Environment: Website with domain name demo.azdigiweb.com Used to review and test new functions.
- Production Environment: Website under localhost with the domain name localhost / azdigiweb.local for developers or web development companies, used to make new features.
That means the programmer will work in the Local environment, after doing so, proceed to push the code to the Staging environment. Here you will see the actual work they have completed (by looking at the diff of git), if ok then you proceed to manually transfer the data made through the Production environment to ensure no one is touched Website is running.

And in this article, I will guide in detail how to set up Staging and Production environment on the same host package using cPanel control panel, and how to synchronize edited data through the feature. Git ™ Version Control on cPanel.
Request
To continue following the guidelines of this article, you need to have the following set up:
- Copy the main website into a copy for staging and install it on the same host as the main website with subdomains. You can use the Duplicator plugin to make a quick copy of the website, in this video I will mention this part.
- There is a localhost software under the computer, can use LocalWP because in this article I will use Ampps.
- Equipped with basic knowledge about Git.
- Can use basic terminal commands like
ls,cd,cat, ... - Host is using cPanel that supports the feature Git ™ Version Control and Terminal. Customers who use hosting at AZDIGI all support these features.
Step 1. Create a git repository for the website staging and connect to localhost
First you will need to create a git repository on the website directory that is doing the staging environment on cPanel host, and then connect the local environment folder to this repository.
Before creating, go to the site staging folder on the host you just copied, create an additional file called .gitignore with the following content:
wp-config.php
wp-content/cache/
debug.log
wp-content/advanced-cache.php
wp-content/object-cache.php
This file will skip some files when synchronizing between machines to avoid configuration errors.
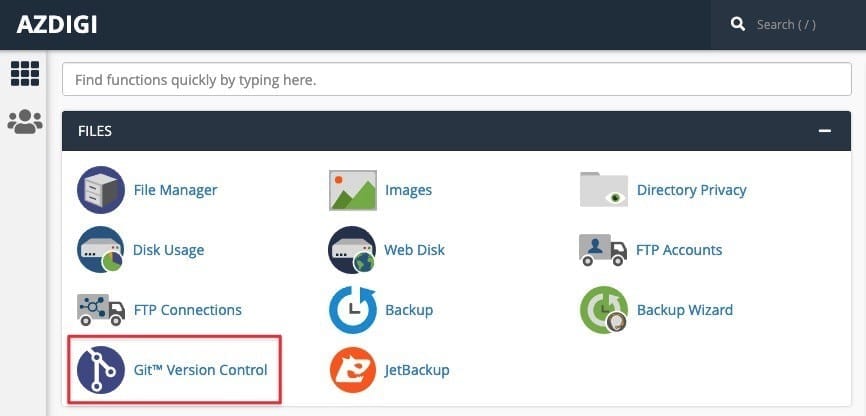
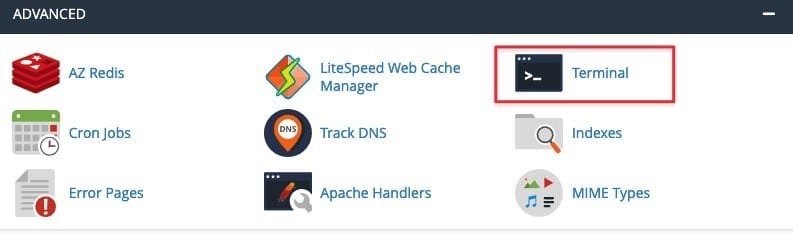
Now go to cPanel dashboard to find Git ™ Version Control.

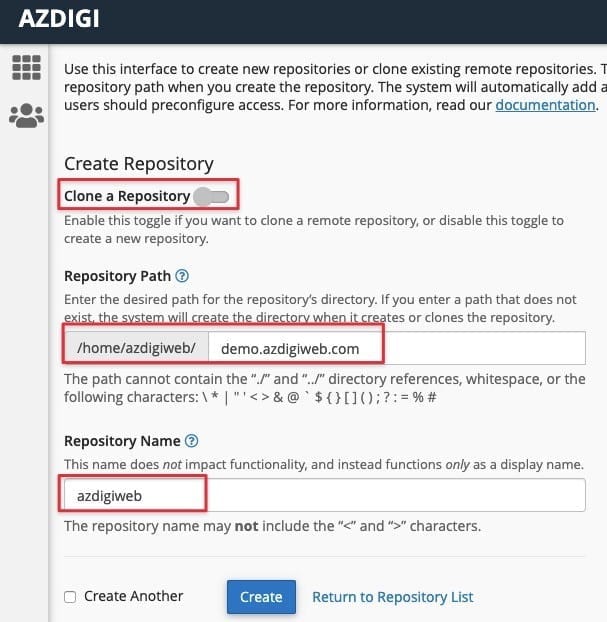
Then uncheck Clone a Repository and enter the path of the staging folder and the name of the repository to create.

You will then be taken to the git setup step for this repository. Here we will clone the website staging to localhost via git so we will choose the option To start a new project cPanel suggests.
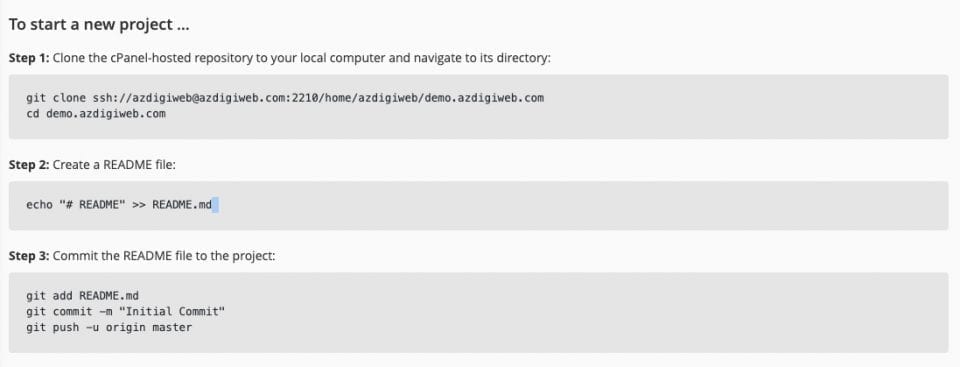

At the computer, you use the command and access the website directory on localhost. For example, I use macOS and use Ampps, the path is as follows:
cd /LocalSite/azdigiweb/app/public
Then clone git newly created on cPanel, it asks for a password, then enter the password to access cPanel.
git clone ssh://azdigiweb@azdigiweb.com:2210/home/azdigiweb/demo.azdigiweb.com .
Remember to put a dot (.) at the end, because we will clone into the directory we are accessing.
Then proceed to create the file README.md and try to commit to the git repository of website staging.
echo "# README" >> README.md
git add .
git commit -m "Init commit"
git push -u origin master
Successful results will return as follows:
Enumerating objects: 3, done.
Counting objects: 100% (3/3), done.
Writing objects: 100% (3/3), 225 bytes | 225.00 KiB/s, done.
Total 3 (delta 0), reused 0 (delta 0)
remote: Recieved update on checked-out branch, queueing deployment.
remote: ---
remote: apiversion: 3
remote: func: create
remote: module: VersionControlDeployment
remote: result:
remote:   data: ~
remote:   errors: ~
remote:   messages: ~
remote:   metadata: {}
remote:
remote:   status: 1
remote:   warnings: ~
To ssh://azdigiweb.com:2210/home/azdigiweb/demo.azdigiweb.com

 * [new branch]      master -> master

Branch 'master' set up to track remote branch 'master' from 'origin'.
Okay so we have completed the step of creating a git repository for site staging and connecting to the computer.
Step 2. Transfer website staging data to localhost via git
Until now, under our localhost there is no data, only the website directory is connected to the git repository on cPanel. Now we will proceed to pull the data from the site staging to localhost via git to keep it synchronized, so that it is easy to work.
Back to cPanel interface, we will conduct a backup of the website staging database, here I use the command with the Terminal feature on the host because we need the database file stored on the host to pull back at the same time.
You on Terminal on cPanel.

Then use the command cd to access the website staging directory, for example:
cd demo.azdigihost.com/
Then use the command mysqldump to retrieve database information (actually there is a faster way is to run the command wp db export but not all shared hosts have WP-CLI installed, of course in AZDIGI, they must have 😌).
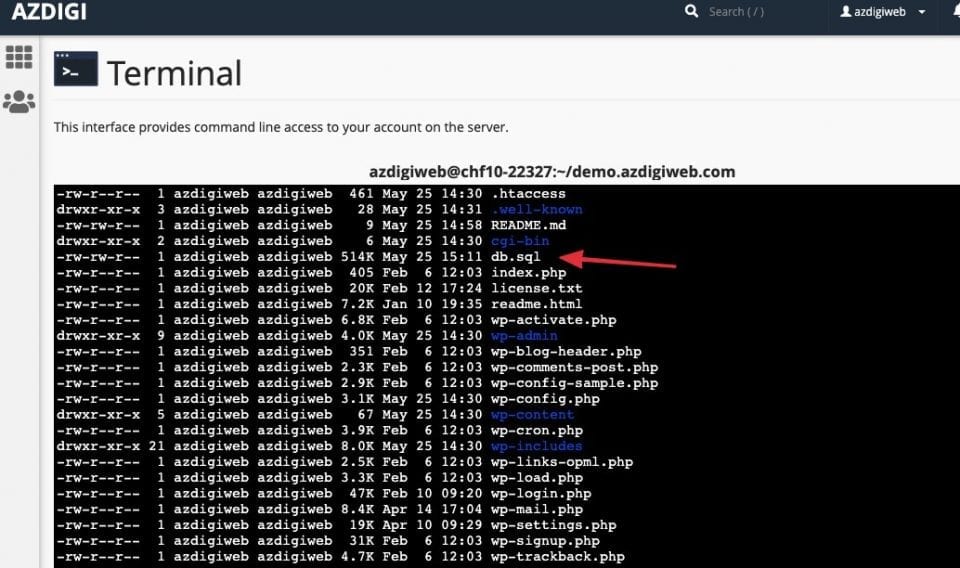
mysqldump -u dbuser -p dbname > db.sql
You rather dbuser into the user database name and dbname into the database name of website staging. After pressing Enter, enter the MySQL password (can be pasted with Ctrl + V). Forget this information, open the wp-config.php file and see.
Then type the command ls -alh If you have the file db.sql and it must have a capacity to complete it.

Then type the following command to add all the files on the website staging folder to git.
git add .
git commit -m "Them ma nguon staging vao Git"
If you get an error fatal: empty ident name on the host, run the following 2 commands, change to your name and email:
git config --global user.email "https://thachpham.com/contact@thachpham.com"
git config --global user.name "Thach Pham"
Then run the command again git commit same as above.
After the commit is complete, go back to localhost and use the command to access the cloned website directory in step 1, then run the command git pull origin master. Now it will download the files you added to git on the cPanel host.
After the clone is complete, you can check the newly downloaded source via git to see if it is enough.
Now you proceed to create the database on localhost, then import the file db.sql Enter and edit the name wp-config-sample.php to wp-config.php and establish a database connection with localhost, and insert the following to set the source code using the domain name of localhost, remember to correct the information Domain name on your localhost:
define( 'WP_HOME', 'http://localhost/azdigiweb.local' );
define( 'WP_SITEURL', 'http://localhost/azdigiweb.local' );
Now you check to see if the website on localhost is fully running, if not, then try again when it runs.
So you have completed the website setup step under localhost by getting the source code through git already. Now just pretend that you are starting to edit the code under localhost and the next part we will proceed to push and deploy to the main website.
Step 3. Deploy from localhost to staging
This is very easy, whenever you commit from localhost and push it, the data will be automatically applied to the staging page immediately, because the localhost's git is connected to the staging site's repository as in the step. 1 I did.
For example, when I have finished the code completion on localhost and want to put it on staging for others to see, I commit as follows:
git add .
git commit -m "Them tinh nang ACB"
git push -u origin master
Step 4. Deploy from the staging to the production site
After your code runs well on the staging site, you will want to move the modified parts of the source code to the production site directory. In this tutorial, I will do so provided that the staging site and the production site are located on the same host using cPanel.
Now under localhost, you create a file named .cpanel.yml with the following content:
 ---
deployment:
  tasks:
    - export DEPLOYPATH=/home/azdigiweb/public_html/
    - /bin/cp -rf wp-content/plugins/ $DEPLOYPATH/wp-content
    - /bin/cp -rf wp-content/themes/ $DEPLOYPATH/wp-content
In it, you rather /home/azdigiweb/public_html/ become the path to the main website directory (production site).
Below that, there are two commands that will copy two directories wp-content/plugins/ and wp-content/themes on git (of the current directory that file .cpanel.yml placed) into the main website directory every time we deploy.
Usually when programming code or theme, just deploy these two folders is enough. You can add more commands if you want.
Then send this file to the staging site by committing and pushing the changes we just made:
git add .
git commit -m "Added .cpanel.yml file"
git push -u origin master
Once the push has been successful, open the interface again cPanel => Git ™ Control Version => Manage => Pull or Deploy, you check the section HEAD Commit is the latest commit git on cPanel is checking out. Or to put it more simply, if you deploy from git to the production site, it will bring the changes of this commit.
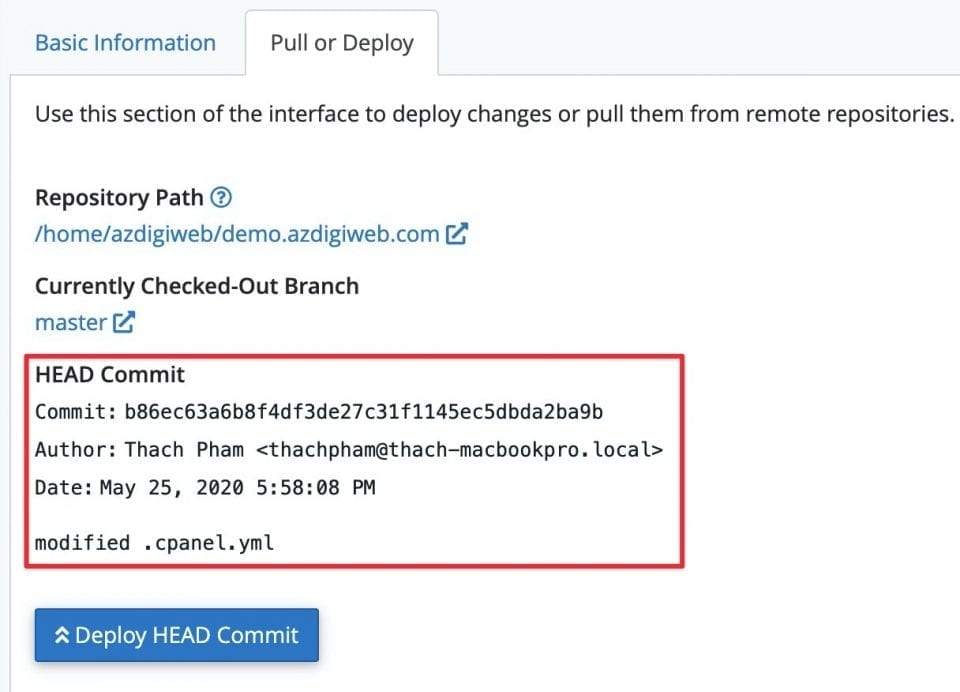

And here if you want to deploy this commit to the production site directory, just press the button Deploy HEAD Commit. When you press this button, it will execute the commands that you have declared in the file .cpanel.yml that you just created earlier, and in that file I have 2 folder copy commands wp-content/themes and wp-content/plugins via the production site so now you can try checking again.
So what about deploying databases?
In this article I use the Git ™ Version Control feature available on cPanel hosts so it will not be possible to deploy the database from localhost to the main site according to the procedure in this article, but will use a different type.
If you are using macOS, you can use WordMove and VVV - Vagrant combos to create a local site environment and synchronize changes data on the staging site, then combine with git to sync from the staging to production site. .
Or if you feel too complicated but need to work according to this process, you can use a plugin like WP Migrate Pro or WP Stage Coach to create staging with database support.
Epilogue
I have written a long time ago so if I have written somewhere that is a bit awkward, then you should comment more.
Regarding the importance of the working environment system like this, you will understand if you look here. In fact, you can see there are a lot of big website systems when they update the new interface, or new features, certainly the time to complete it is very long, but they are almost uninterrupted or affecting users. ; If yes, only a few minutes. This is thanks to a combination of work environments like this, everything only posted on the main website when completed to ensure the least errors and bugs.
Another tip is that you can create git or staging for each plugin / theme directory that needs fixing in your WordPress website because sometimes you don't need to completely copy the main website that is running to do this if you work with outsiders. You need to make sure the database doesn't fall into the wrong hands.
When I have more time, I will talk about some other simple ways to create staging with a cleaner workflow, but it will probably cost you 🤪.
I wish you success 👍.

0 Comments