Website security should be a top priority for every WordPress user. You'll need to find ways to avoid trouble bots and malicious users, so they can't target your site with spam or steal sensitive information. Sometimes, that requires learning how to block IP addresses in WordPress.
This is possible through the use of a 'black list' - a technique that restricts specific IPs to use certain features on your site or prevent them from fully accessing them. For example, you can use the blacklist to prohibit addresses with specific red flags or to avoid spammers from your comments.
In this post, we will introduce you to the concept of blacklisting and talk about situations where it can serve as a useful technique. We will then show you how to block IP addresses in WordPress using two different methods. Let's get started!
About blacklist
Every user who visits your WordPress site has it IP address . This number identifies a specific Internet connection (network) and is constant even if the same user creates multiple accounts. This means you can use your IP address to track your visitors and detect any malicious addresses.
The following are examples of red flags that indicate that users of a particular IP address are potentially harmful:
- A large number of consecutive login attempts (indicating a potential attempt to hack your site).
- Lots of spam comments are posted by users from the same IP address.
- Attempted access to sensitive information or restricted by unspecified user or user without correct permissions.
If you see a suspicious activity pattern like this, you can ‘blacklist’ the IP addresses involved. In other words, you can ban any user from that address. This could be a complete ban - so they are completely unable to access your site - or could simply be a restriction from specific features or areas on your site.
As an alternative approach, you can also use Wikipedia's whitelist, essentially the opposite - all IP addresses are blocked. except for specific IP addresses that are allowed . We also wrote an article about whitelisted IP addresses in WordPress.
How to block IP address in WordPress (2 methods)
As we mentioned earlier, one of the most useful aspects of blacklisting is that you can choose exactly what you want to block suspicious users from doing. Now, let's discuss how to block IP addresses in WordPress using two different methods. The first will be a more targeted strategy, while the second will cause users to have problems throughout your site.
1. Block specific IP addresses from using your comments
A common use for blacklists is to prevent spammers and bots from posting unwanted messages in your comments. If you access the tab Comment In your WordPress dashboard, you can see the IP address of each message posted from:
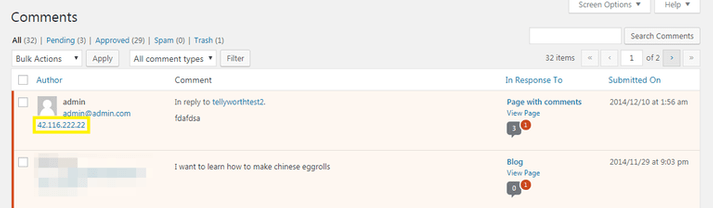
When you notice multiple spam comments coming from the same IP - even if they are posted by different users - you just need to block that address. To do this, navigate to Settings> Discussion and find a school Blacklist Reviews :
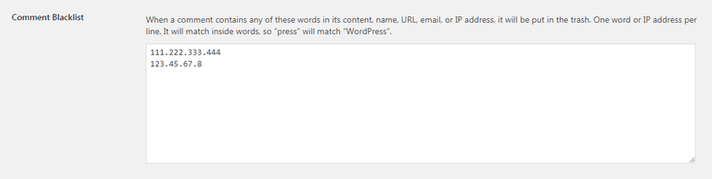
Here, you can paste in any problematic IP address. Save your changes and users from those IPs will no longer be able to post comments on your site.
If you're worried about accidentally blacklisting legitimate users, you can instead place suspicious IPs in the field. Comment Moderation right above. New comments from those addresses will then be approved, so you can follow them to see if they are actually spammers.
2. Completely ban IP addresses from your website
Of course, you may also want to block users with a suspicious activity pattern from accessing your site entirely. To do that, you can make a simple addition to one of your WordPress files. Make sure you have a recent backup in place in advance, as a security precaution. You will then need to log in directly to your website using the File Transfer Protocol (FTP). If you've never done this before, you can check out our beginner's guide to FTP.
With your FTP client open and running, find the root directory of your website. This is usually named after your domain name, but can also be called www or root . With this directory marked, find the file .htaccess
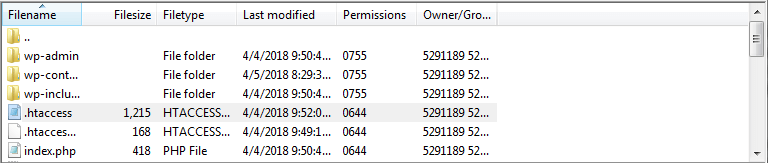
Right click on this file and select View / Edit . This will open the file in your default text editor, allowing you to make changes. On a new line at the bottom of the file, paste in the following code :
Order Allow, Deny
Allow from all
Deny from 111.222.333.444
You will want to replace the series of numbers in the last line with the first IP address you want to block. Then you can add the lines Refuse Additionally, each line has a new IP. Save the file and users from those IP addresses will no longer be able to access your website.
If you do not want to edit the file directly .htaccess You can also use plugins All In One WP Security & Firewall free:

Firewall and security all in one WP
Locate the IP for your blacklist
As you can see, learning how to block IP addresses in WordPress is quite simple. However, there's one step we haven't covered - how to find the IP you need to ban. This is insignificant when you handle the comments, as we discussed earlier. However, it will be a little harder when you are looking for suspicious IPs that you want to completely stay away from your site.
There are several ways you can identify IPs can be malicious. You can use an activity log plugin, for example, it will keep a record of everything important happening on your website. By looking through the result log, you can identify IP addresses that have taken too many logins or tried to access sensitive information. If you don't have an active logging plugin set up on your site yet, WP security audit log is a great option.
Also, you can often find some similar information in web server logs. Access your hosting control panel and find the option named Rough access or Rough access logs :
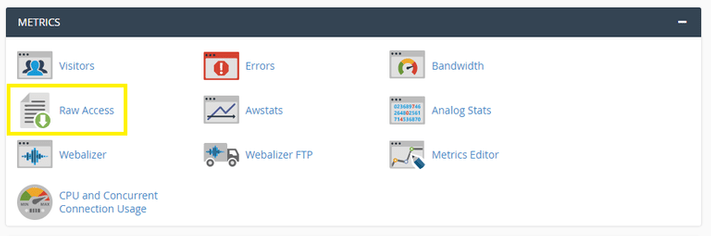
Here, you can download a file with information about all hits made on your site. Again, you can then search for IP addresses that have tried to access sensitive pages or have performed unusually high number of login attempts. If you have trouble locating this option in the control panel, you can usually find help in the hosting provider's documentation.
Understanding these logs and figuring out which IP to block can be a bit of practice. However, taking the time to ensure your site security is always taking good time.
Conclusion
The initial blacklist may sound like a bad thing, but it's actually a very useful method to protect your site. By learning how to block IP addresses in WordPress, you can prevent hackers and spammers without disturbing your legitimate users.
Once you've decided to implement a blacklist on your website, here are two ways you can get the job done:
- Block specific IP addresses from your comments, using the WordPress default function.
- IP addresses are banned from your site completely, by editing the file .htaccess
Do you have questions about how to block IP addresses in WordPress or when to do so? Ask us in the comments section below!

CEO - Founder of Compa Marketing. Specialist with over 5 years of experience in the field of Digital Marketing, SEO / SEM in Vietnam and the world.

0 Comments